はじめに
以前、pyinstallerを用いてDICOM画像の匿名化ソフトを作成するときにpyinstallerを用いた記事を書きました。
自分が作成したプログラムをexe化する時にもpyinstallerを用いたのですが、そのファイルの起動が遅いなと感じていました。
ただ、その時はまだ許容範囲内だったのですが最近研究用のプログラムをexe化したらこれがやたらと遅い。。。。
3分ぐらいかかってやっと起動。
これじゃ、、、、、、
exe化できる他のライブラリーが無いかなと探していたらcx_Freezeなるものがあるのを知り使ってみましたのでレポートしてみたいと思います。
インストール
インストールはpipを用いてインストールしました。コマンドプロンプトを立ち上げて、exe化する仮想環境でpipを実行します。
今回のプログラムは前回構築した仮想環境で作成しているのでそちらにインストールします。
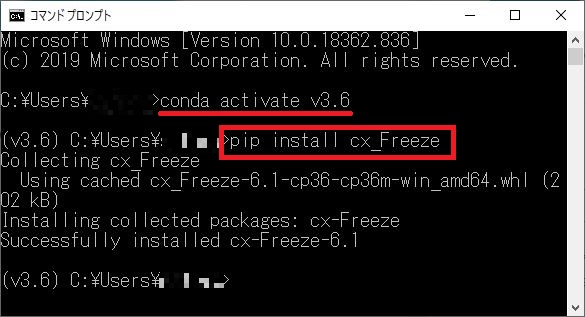
まずは、コマンドプロンプトを立ち上げて仮想環境をアクティベートします。以前構築した環境名はv3.6なので以下のコマンドで実行します。
conda activate v3.6
上記コマンドを実行した後、以下の図の様に初めに(V3.6)と環境名が出ていればアクティベートできています。

その後、pipを用いてインストールします。Freezeの ‘F’ が大文字なので気を付けてください。
pip install cx_Freeze
これで、インストールが完了しました。
セットアップファイルの作成
pyinstallを使用する際は必要なかったのですが、cx_Freezeを使用する場合はsetupファイルを作成しなくてはいけません。
このサイトを参考にさせて頂きました。
作る場所は、exe化したいプロジェクトのフォルダに作成します。
# coding: utf-8

import sys, os
from cx_Freeze import setup, Executable

file_path = input("アプリ化したいpy:")

if sys.platform == "win32":
    base = None # "Win32GUI"

    os.environ['TCL_LIBRARY'] = "C:\\Users\\[user名]\\anaconda3\\envs\\v3.6\\tcl\\tcl8.6"
    os.environ['TK_LIBRARY']  = "C:\\Users\\[user名]\\anaconda3\\envs\\v3.6\\tcl\\tk8.6"
else:
    base = None # "Win32GUI"

#importして使っているライブラリを記載
packages = []

#importして使っているライブラリを記載(こちらの方が軽くなるという噂)
includes = [
    "sys",
    "os",
    "requests",
]

#excludesでは、パッケージ化しないライブラリやモジュールを指定する。
"""
numpy,pandas,lxmlは非常に重いので使わないなら、除く。(合計で80MBほど)
他にも、PIL(5MB)など。
"""
excludes = [
    "numpy",
    "pandas",
    "lxml"
]

exe = Executable(
    script = file_path,
    base = base
)

# セットアップ
setup(name = 'main',
      options = {
          "build_exe": {
              "packages": packages,
              "includes": includes,
              "excludes": excludes,
          }
      },
      version = '0.1',
      description = 'converter',
      executables = [exe])
ここで12、13行目のTCL_LIBRARYとTK_LIBRARYの設定ですが、ここは人それぞれで変わってきます。
tcl8.6とtk8.6のファイルは仮想環境ごとにあります。
私の場合、仮想環境の情報はanacondaがインストールしてあるフォルダのenesの中にあります。場所が分からない場合はPyCharmを立ち上げて「ファイル」→「設定」→「プロジェクト」→「Pythonインタープリター」を開き「プロジェクト・インターぷりたー」に記載されているパスを追っていくと、仮想環境の場所までたどり着きます。そこにtclのフォルダがありますので、そこの「tcl8.6」と「tk8.6」のファイルのパスを指定してあげればOKです。

後は、18行目や、21行目、38行目の設定をして完了となります。
importしているライブラリに関しては、全て書いてしまいました。
また、32行目のexcludesには仮想環境内にインストールしていて、使っていないライブラリを記載しておきました。
いざ、exe化!
まずは、コマンドプロンプトを立ち上げディレクトリーをexe化したいフォルダまで移動します。
移動の仕方は’cd 移動先フォルダのパス’で移動できます。
そこで、以下のコマンドを打ちます。
python setup.py build
その後、exe化したいファイル名を聞かれますので一番初めの文字を打ち込みTabキーを押していくと目的のファイルが表示されるので、Enterを押すとexe化の処理が始まります。
処理が完了すると「build」というフォルダが出来上がっています。
その中に「exe.win-amd64-・・・」というフォルダがあり、その中にexeファイルがあります。それをダブルクリックすることでプログラムが起動します。
ちなみに、exeファイルだけでは起動しません。なので、移動したい場合はフォルダごと移動し、exeファイルのショートカットをデスクトップなり希望の場所に配置して使用してください。
いかがでしたか?きちんと起動しましたか?
最後に
今回は、cx_Freezeを用いてプロジェクトをexe化のレポートをしました。
pyinstallを用いた場合、3分程度かかっていたものがcx_Freezeを用いることで数秒で起動するようになりました。
正直、setupファイルを作成するのは面倒ですが、その後の起動時間を考えたらcx_Freezeは絶対に使った方がいいと思います。
また、一度作成したsetupファイルは再利用もできるので初めだけの苦労と思えばがんばる気になれますよね。
次回は、cx_Freezeで作成した際に起こったエラー対処を書きたいと思います。
環境
- windows10
- python3.6.1
- Anaconda custom(64-bit)
- PyCharm2020.2(Communication Edition)

