前回記事、DICOM画像を用いてopenCVの領域抽出をやってみた①
前回、画像領域値をせて値を確認できるプログラムを組んでみたをベースとして画像領域を一つ追加し、4種類の領域抽出できるプログラムを組みました。
今回は、それらプログラムを連結させてプログラムとして完成させましょう。
Contents
前回までのプログラム
import tkinter as tk
import cv2
import matplotlib.pyplot as plt
from matplotlib.backends.backend_tkagg import FigureCanvasTkAgg
import numpy as np
import pydicom
import fileselect as fs

def cont():
    img_unit8 = copy.deepcopy(img_arr) #img_unit8としてコピー
    np.clip(img_unit8, ww_low, ww_high, out= img_unit8)
      #コピーした配列の最低値以下をウインドウ幅最低値に、
       # 最高値以上も同様に)

    img_unit8 -= img_unit8.min()
      #配列全体をウインドウ幅最低値を引くことで0からに変更)

    np.floor_divide(img_unit8, (img_unit8.max() + 1) / 256,
            out = img_unit8, casting='unsafe')
      #ウインドウ幅を256分割する。

    cv2.imwrite('./img_8bit.png',img_unit8)

def external():
    img_png = cv2.imread('img_8bit.png')
    thresh_8bit = thresh.astype('u1')
    ret, contours, hierarchy = cv2.findContours(thresh_8bit, 0,   cv2.CHAIN_APPROX_SIMPLE)

    for contour in contours:
        cv2.drawContours(img_png, contours, -1, (255, 255, 0), 1)

    ax3.imshow(img_png, cmap='bone')
    fig.canvas.draw()

def list():
    img_png = cv2.imread('img_8bit.png')
    thresh_8bit = thresh.astype('u1')
    ret, contours, hierarchy = cv2.findContours(thresh_8bit, 1,  cv2.CHAIN_APPROX_SIMPLE)

    for contour in contours:
        cv2.drawContours(img_png, contours, -1, (255, 255, 0), 1)

    ax3.imshow(img_png, cmap='bone')
    fig.canvas.draw()

def ccomp():
    img_png = cv2.imread('img_8bit.png')
    thresh_8bit = thresh.astype('u1')
    ret, contours, hierarchy = cv2.findContours(thresh_8bit, 2, cv2.CHAIN_APPROX_SIMPLE)

    for contour in contours:
        cv2.drawContours(img_png, contours, -1, (255, 255, 0), 1)

    ax3.imshow(img_png, cmap='bone')
    fig.canvas.draw()

def tree():
    img_png = cv2.imread('img_8bit.png')
    thresh_8bit = thresh.astype('u1')
    ret, contours, hierarchy = cv2.findContours(thresh_8bit, 3,   cv2.CHAIN_APPROX_SIMPLE)

    for contour in contours:
        cv2.drawContours(img_png, contours, -1, (255, 255, 0), 1)

    ax3.imshow(img_png, cmap='bone')
    fig.canvas.draw()

def level():
    global ww_low, ww_high, w_level, w_width

    window_level, window_width = level_sc.get(), w_width_sc.get()

    ww_low = window_level - (window_width // 2)
    ww_high = window_level + (window_width // 2)

def window(self):
    global ww_low, ww_high, img_arr, ax1

    level()

    ax1.imshow(img_arr, cmap='bone', vmin=ww_low, vmax=ww_high)
    fig.canvas.draw()

def thresho(self):
    global img_arr, ax2, fig

    ret, thresh = cv2.threshold(img_arr, int(self), 255, cv2.THRESH_BINARY)
    ax2.imshow(thresh, cmap='bone')

    fig.canvas.draw()

def main():
    global ww_low, ww_high, img_arr, thre_sc, ax2, fig,\
        img_arr, ax1, level_sc, w_width_sc, ww_low, ww_high, w_level, w_width


    filename = fs.single_fileselect()
    dcm = pydicom.dcmread(filename)
    img_arr = np.array(dcm.pixel_array)
    w_level = int(dcm[0x0028,0x1050].value)
    w_width = int(dcm[0x0028, 0x1051].value)

    fig = plt.figure(figsize=(12, 6))
    ax1 = fig.add_subplot(1, 3, 1)
    ax2 = fig.add_subplot(1, 3, 2)
    ax3 = fig.add_subplot(1, 3, 3)

    ax1.axes.xaxis.set_visible(False), ax1.axes.yaxis.set_visible(False)
    ax2.axes.xaxis.set_visible(False), ax2.axes.yaxis.set_visible(False)
    ax3.axes.xaxis.set_visible(False), ax3.axes.yaxis.set_visible(False)


    root = tk.Tk()
    root.geometry("1410x600")

    Canvas = FigureCanvasTkAgg(fig, master=root)
    Canvas.get_tk_widget().grid(row=0, column=0, rowspan=10)


    var_scale_level = tk.IntVar()
    level_sc = tk.Scale(root,
        label='Window Level',
        variable=var_scale_level,
        orient=tk.HORIZONTAL,
        length=200,
        from_= np.min(img_arr),
        to=np.max(img_arr),
        command=window)
    level_sc.set(w_level)
    level_sc.grid(row=1, column=1)

    var_scale_w_width = tk.IntVar()
    w_width_sc = tk.Scale(root,
        label = 'Window Width',
        variable=var_scale_w_width,
        orient=tk.HORIZONTAL,
        length=200,
        from_=0,
        to=(np.max(img_arr) - np.min(img_arr))//2,
        command=window)
    w_width_sc .set(w_width)
    w_width_sc.grid(row=3, column=1)


    thre = 0

    var_thre = tk.IntVar()
    thre_sc = tk.Scale(root,
        label='Threshold',
        variable=var_thre,
        orient=tk.HORIZONTAL,
        length=200,
        from_=np.min(img_arr),
        to=np.max(img_arr),
        command=thresho)
    thre_sc.set(thre)
    thre_sc.grid(row=5, column=1)


    ext_but = tk.Button(root, text="EXTERNAL", command=external, width = 10)
    ext_but.grid(row=8, column=1)

    list_but = tk.Button(root, text="LIST", command=list, width = 10)
    list_but.grid(row=8, column=2)

    ccomp_but = tk.Button(root, text="CCOMP", command=ccomp, width = 10)
    ccomp_but.grid(row=9, column=1)

    TREE_but = tk.Button(root, text="TREE", command=tree, width = 10)
    TREE_but.grid(row=9, column=2)

    window(1)
    thresho(1)

    root.mainloop()

if __name__ == "__main__":
    main()
今回の流れ
それでは、今回の流れです。
前回は4つの領域抽出のプログラムを作成しましたが、流れとして繋がっていないのでまずは、これを繋げて動くようにしたいと思います。
その後、領域抽出した面積や、周囲の長さを求めるコードを書いていきたいと思います。
ボタンに関数を紐づける
それぞれのボタンが押された時の動作を紐づけます。
ボタンを作成した際にcommandの引数で指定してあげることで動作を紐づけることが出来ます。
ext_but = tk.Button(root, text=”EXTERNAL”, command=external, width = 10)
作成した4つのボタンに関数の紐づけをしましょう。
領域抽出までのプログラムを繋げる
それでは、繋げていきたいと思います。
領域抽出のボタンが押された際に、まず一番左の画像を汎用画像として保存するプログラムを走らせます。その後に領域抽出を行う必要があります。
関数のexternal,list,ccomp,treeの関数が呼び出された際にまず、contの関数を呼び出し、左側の画像を汎用画像として保存させますので、それぞれの関数の初めに
cont()
と4つの関数の初めに入力しておきましょう。
そして、保存した画像を読み込みます。
img_png = cv2.imread(‘img_8bit.png’)
これで、プログラムが動くようになりました。
抽出領域の面積、長さを求める
抽出した領域の面積は、
cv2.contourArea()
周囲の長さを求めるのは
cv2.arcLength()
で求めることが出来ます。ただ、この関数の場合は第2引数が必要で、閉じている線(True)か閉じていない線(False)なのかを指定してあげる必要があります。
ちなみに、重心を求めるのは
cv2.moments()
で求めることが出来ます。
それぞれ、引数にはcontoursの何番目のデータかを指定する必要があります。
それでは、これも関数として作成しましょう。
関数名はcont_momentとして作成しました。
その際、それぞれの領域抽出した結果を引数として受けることにします。
後は、for文で回して格納してある分だけプロントアウトしていくだけです。
def cont_moment(contours):
    print('I got ' + str(len(contours)) + ' contours')

    for i in range(len(contours)):
        print('Contour area\t' + str(cv2.contourArea(contours[i])) + '\t arc length\t' + str(cv2.arcLength(contours[i],True)))
そして、4つの領域抽出の関数の最後に
cont_moment(contours)
を追加します。
値を微調整できるボタンを設置
私のコードがいけないのか、パソコンのスペックが低いのか、スライダーを動かすと動作がカクついてしまうので5程度づつ調整できるボタンを設置したいと思います。
ボタンの設置は領域抽出の時と同じです。
例えば、ウインドウレベルの場合は以下の様にボタンの設置を行います。
down_wl_btn = tk.Button(root, text="down", command=down_wl)
down_wl_btn.grid(row=2, column=1)

up_wl_btn = tk.Button(root, text=" up ", command=up_wl)
up_wl_btn.grid(row=2, column=2)
コマンドの関数は以下になります。
def down_wl():
    val = level_sc.get() - 5
    level_sc.set(val)

def up_wl():
    val = level_sc.get() + 5
    level_sc.set(val)
現在のスケールの値とそこから増減したい数値を増減した値(今回は5増減)をvalという変数に持たせ、それをスケールの値にセットする形になります。
スケールにセットするやり方は
スケール名.set(値)
で出来ます。
ウインドウ幅、閾値に関しても同様に作成してください
追加
忘れていました・・・・・
画像領域を追加した際にax3を追加しました。
しかし、このax3はmain関数の中で宣言していますので、他の関数では使うことが出来ませんのでグローバル宣言をしておきましょう。
main関数 def main(): のすぐ下にglobalと記載がありますが、そこにax3を追加します。
同様にthreshも追加してください。また、threshはスケールを動かした時にも変化しますので関数threshoにおいてもthreshをグローバル化しておいてください
あと、汎用画像を作成する際に配列をコピーするのに、copyというライブラリーを使用していませんがインポートしていませんでした。
import copy
と追加してください。
調整
プログラムは完成しましたが、最終的に見た目の調整をします。
今までのコードを実行すると以下のような画面となり、ちょっとカッコ悪いので調整していきたいと思います。
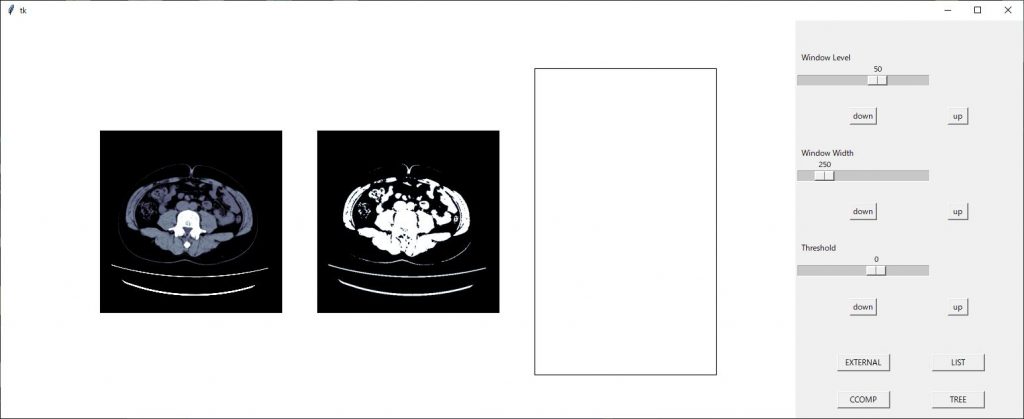
まずは、画像間隔を調整します。
axの軸設定の後に
plt.subplots_adjust(left=0.01, right=0.995, bottom=0, top=1, wspace=0.01)
のコードを挿入し画像間隔を設定します。詳しくはこちら
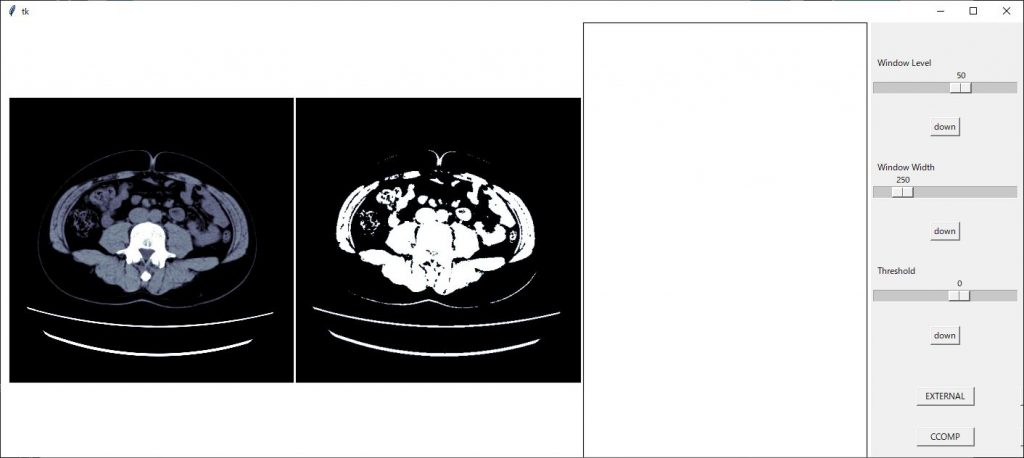
画像間隔が狭まりました。
新たに作成したax3の領域が大きいので画像サイズを(13,4)に変更してみます。
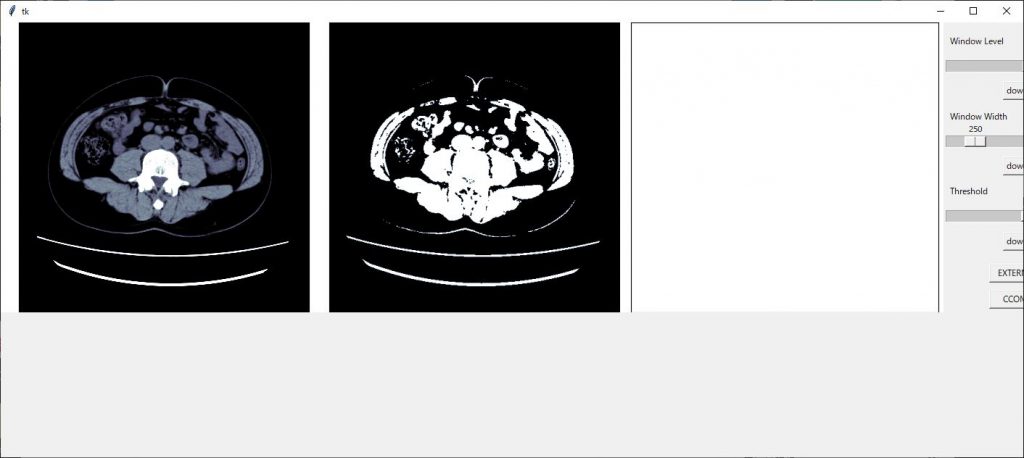
整ってきました、スケールの部分が切れてしまっているので領域のジオメトリーを 1510×500 に変更します
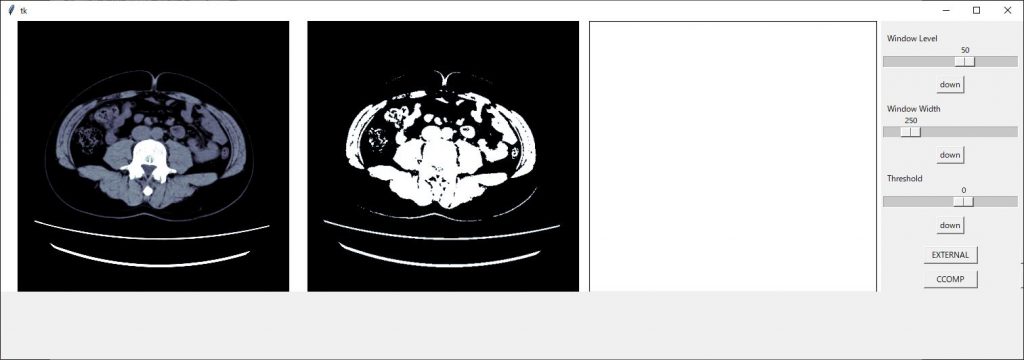
後はボタン類の配置を修正すれば見栄えが良くなりそうです
スケールの配置で1枠を使ってしまっているので2つを使い表示させるようにします。
スケールの設定で columnspan = 2
2枠を使った表示にできますのでそれぞれのスケールに追加します。
w_width_sc.grid(row=3, column=1,columnspan=2)
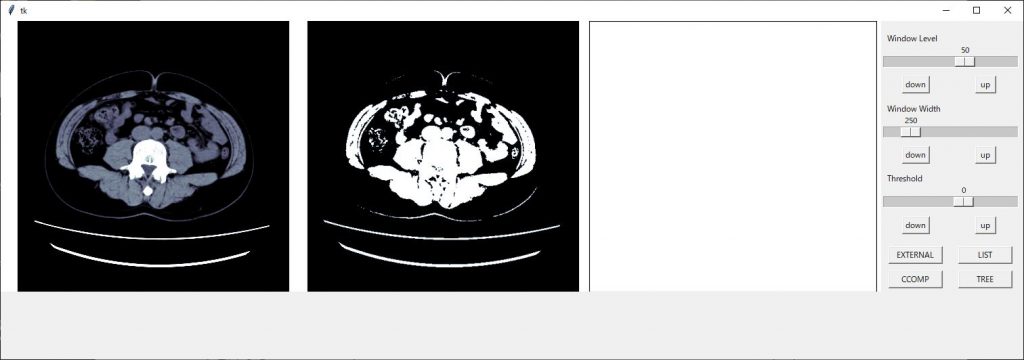
きれいに整いました!!
完成したコード
import tkinter as tk
import cv2
import matplotlib.pyplot as plt
from matplotlib.backends.backend_tkagg import FigureCanvasTkAgg
import numpy as np
import pydicom
import fileselect as fs
import copy

def cont():
    img_unit8 = copy.deepcopy(img_arr) #img_unit8としてコピー
    np.clip(img_unit8, ww_low, ww_high, out= img_unit8)
      #コピーした配列の最低値以下をウインドウ幅最低値に、
      # 最高値以上も同様に)

    img_unit8 -= img_unit8.min()
      #配列全体をウインドウ幅最低値を引くことで0からに変更)

    np.floor_divide(img_unit8, (img_unit8.max() + 1) / 256,
            out = img_unit8, casting='unsafe')
      #ウインドウ幅を256分割する。

    cv2.imwrite('./img_8bit.png',img_unit8)

def external():
    cont()
    img_png = cv2.imread('img_8bit.png')
    thresh_8bit = thresh.astype('u1')
    ret, contours, hierarchy = cv2.findContours(thresh_8bit, 0,   cv2.CHAIN_APPROX_SIMPLE)

    for contour in contours:
        cv2.drawContours(img_png, contours, -1, (255, 255, 0), 1)

    ax3.imshow(img_png, cmap='bone')
    fig.canvas.draw()
    cont_moment(contours)

def list():
    cont()

    img_png = cv2.imread('img_8bit.png')
    thresh_8bit = thresh.astype('u1')
    ret, contours, hierarchy = cv2.findContours(thresh_8bit, 1,  cv2.CHAIN_APPROX_SIMPLE)

    for contour in contours:
        cv2.drawContours(img_png, contours, -1, (255, 255, 0), 1)

    ax3.imshow(img_png, cmap='bone')
    fig.canvas.draw()
    cont_moment(contours)

def ccomp():
    cont()
    img_png = cv2.imread('img_8bit.png')
    thresh_8bit = thresh.astype('u1')
    ret, contours, hierarchy = cv2.findContours(thresh_8bit, 2, cv2.CHAIN_APPROX_SIMPLE)

    for contour in contours:
        cv2.drawContours(img_png, contours, -1, (255, 255, 0), 1)

    ax3.imshow(img_png, cmap='bone')
    fig.canvas.draw()
    cont_moment(contours)

def tree():
    cont()
    img_png = cv2.imread('img_8bit.png')
    thresh_8bit = thresh.astype('u1')
    ret, contours, hierarchy = cv2.findContours(thresh_8bit, 3,   cv2.CHAIN_APPROX_SIMPLE)

    for contour in contours:
        cv2.drawContours(img_png, contours, -1, (255, 255, 0), 1)

    ax3.imshow(img_png, cmap='bone')
    fig.canvas.draw()
    cont_moment(contours)

def cont_moment(contours):
    print('I got ' + str(len(contours)) + ' contours')

    for i in range(len(contours)):
        print('Contour area\t' + str(cv2.contourArea(contours[i])) + '\t arc length\t' + str(cv2.arcLength(contours[i],True)))


def level():
    global ww_low, ww_high, w_level, w_width

    window_level, window_width = level_sc.get(), w_width_sc.get()

    ww_low = window_level - (window_width // 2)
    ww_high = window_level + (window_width // 2)

def window(self):
    global ww_low, ww_high, img_arr, ax1

    level()

    ax1.imshow(img_arr, cmap='bone', vmin=ww_low, vmax=ww_high)
    fig.canvas.draw()

def thresho(self):
    global img_arr, ax2, fig
, thresh

    ret, thresh = cv2.threshold(img_arr, int(self), 255, cv2.THRESH_BINARY)
    ax2.imshow(thresh, cmap='bone')

    fig.canvas.draw()

def up():
    val = thre_sc.get() + 5
    thre_sc.set(val)

def down():
    val = thre_sc.get() - 5
    thre_sc.set(val)

def down_wl():
    val = level_sc.get() - 5
    level_sc.set(val)

def up_wl():
    val = level_sc.get() + 5
    level_sc.set(val)


def down_ww():
    val = level_sc.get() - 5
    level_sc.set(val)


def up_ww():
    val = level_sc.get() + 5
    level_sc.set(val)

def main():

    global ww_low, ww_high, img_arr, thre_sc, ax2, fig, \
        img_arr, ax1, level_sc, w_width_sc, ww_low, ww_high, w_level, w_width, \
        ax3, thresh


    filename = fs.single_fileselect()
    dcm = pydicom.dcmread(filename)
    img_arr = np.array(dcm.pixel_array)
    w_level = int(dcm[0x0028,0x1050].value)
    w_width = int(dcm[0x0028, 0x1051].value)

    fig = plt.figure(figsize=(13, 4))
    ax1 = fig.add_subplot(1, 3, 1)
    ax2 = fig.add_subplot(1, 3, 2)
    ax3 = fig.add_subplot(1, 3, 3)

    ax1.axes.xaxis.set_visible(False), ax1.axes.yaxis.set_visible(False)
    ax2.axes.xaxis.set_visible(False), ax2.axes.yaxis.set_visible(False)
    ax3.axes.xaxis.set_visible(False), ax3.axes.yaxis.set_visible(False)
    plt.subplots_adjust(left=0.01, right=0.995, bottom=0, top=1, wspace=0.01)


    root = tk.Tk()
    root.geometry("1510x500")

    Canvas = FigureCanvasTkAgg(fig, master=root)
    Canvas.get_tk_widget().grid(row=0, column=0, rowspan=10)


    var_scale_level = tk.IntVar()
    level_sc = tk.Scale(root,
        label='Window Level',
        variable=var_scale_level,
        orient=tk.HORIZONTAL,
        length=200,
        from_= np.min(img_arr),
        to=np.max(img_arr),
        command=window)
    level_sc.set(w_level)
    level_sc.grid(row=1, column=1,columnspan=2)

    down_wl_btn = tk.Button(root, text="down", command=down_wl)
    down_wl_btn.grid(row=2, column=1)

    up_wl_btn = tk.Button(root, text=" up ", command=up_wl)
    up_wl_btn.grid(row=2, column=2)

    var_scale_w_width = tk.IntVar()
    w_width_sc = tk.Scale(root,
        label = 'Window Width',
        variable=var_scale_w_width,
        orient=tk.HORIZONTAL,
        length=200,
        from_=0,
        to=(np.max(img_arr) - np.min(img_arr))//2,
        command=window)
    w_width_sc .set(w_width)
    w_width_sc.grid(row=3, column=1,columnspan=2)

    down_ww_btn = tk.Button(root, text="down", command=down_ww)
    down_ww_btn.grid(row=4, column=1)

    up_ww_btn = tk.Button(root, text=" up ", command=up_ww)
    up_ww_btn.grid(row=4, column=2)

    thre = 0

    var_thre = tk.IntVar()
    thre_sc = tk.Scale(root,
        label='Threshold',
        variable=var_thre,
        orient=tk.HORIZONTAL,
        length=200,
        from_=np.min(img_arr),
        to=np.max(img_arr),
        command=thresho)
    thre_sc.set(thre)
    thre_sc.grid(row=5, column=1)

    down_btn = tk.Button(root, text="down", command=down)
    down_btn.grid(row=6, column=1,columnspan=2)

    up_btn = tk.Button(root, text=" up ", command=up)
    up_btn.grid(row=6, column=2)

    ext_but = tk.Button(root, text="EXTERNAL", command=external, width = 10)
    ext_but.grid(row=8, column=1)

    list_but = tk.Button(root, text="LIST", command=list, width = 10)
    list_but.grid(row=8, column=2)

    ccomp_but = tk.Button(root, text="CCOMP", command=ccomp, width = 10)
    ccomp_but.grid(row=9, column=1)

    TREE_but = tk.Button(root, text="TREE", command=tree, width = 10)
    TREE_but.grid(row=9, column=2)

    window(1)
    thresho(1)

    root.mainloop()

if __name__ == "__main__":
    main()
最後に
いかがでしたか?領域抽出のプログラムきちんと動きましたか?
このコードを更に発展させていけば、内臓脂肪計測のプログラムも作れそうですね。
興味のある方は挑戦してみてください。
お疲れ様でした。
環境
- windows10
- python3.6.1
- Anaconda custom(64-bit)
- PyCharm2020.2(Communication Edition)


