Notice: Function _load_textdomain_just_in_time was called incorrectly. Translation loading for the urvanov-syntax-highlighter domain was triggered too early. This is usually an indicator for some code in the plugin or theme running too early. Translations should be loaded at the init action or later. Please see Debugging in WordPress for more information. (This message was added in version 6.7.0.) in /virtual/mcu03iphuk/public_html/radiology-technologist.info/wp-includes/functions.php on line 6114

Notice: Function _load_textdomain_just_in_time was called incorrectly. Translation loading for the breadcrumb-navxt domain was triggered too early. This is usually an indicator for some code in the plugin or theme running too early. Translations should be loaded at the init action or later. Please see Debugging in WordPress for more information. (This message was added in version 6.7.0.) in /virtual/mcu03iphuk/public_html/radiology-technologist.info/wp-includes/functions.php on line 6114

Notice: Function _load_textdomain_just_in_time was called incorrectly. Translation loading for the advanced-ads domain was triggered too early. This is usually an indicator for some code in the plugin or theme running too early. Translations should be loaded at the init action or later. Please see Debugging in WordPress for more information. (This message was added in version 6.7.0.) in /virtual/mcu03iphuk/public_html/radiology-technologist.info/wp-includes/functions.php on line 6114

Notice: 関数 _load_textdomain_just_in_time が誤って呼び出されました。lancr ドメインの翻訳の読み込みが早すぎました。これは通常、プラグインまたはテーマの一部のコードが早すぎるタイミングで実行されていることを示しています。翻訳は init アクション以降で読み込む必要があります。 詳しくは WordPress のデバッグをご覧ください。 (このメッセージはバージョン 6.7.0 で追加されました) in /virtual/mcu03iphuk/public_html/radiology-technologist.info/wp-includes/functions.php on line 6114
tkinterでopenCVの画像を表示 | 診療放射線技師がPythonをはじめました。

tkinterでopenCVの画像を表示

はじめに

こんにちは。でめきんです。

前々回、「tkinterでmatplotlibの画像を表示」という記事を書きましたが、今回は「openCVの画像を表示する」をやってみたいと思います。

openCVは画像処理や、動画を処理するライブラリーとなっていますので、tkinter上にopenCVで取り込んだ画像を表示できれば、tkinterのGUI機能であるボタン等に画像処理の機能を実装することが出来るようになります。

いわゆる、画像処理ソフト的なものを作成することが出来るかもしれません。

一見、openCVで取り込んだ画像をtkinterに表示ととらえられるかもしれませんが、実際はopenCVで取り込んだ画像をmatplotlibで表示。それをtkinter上に表示するという流れになります。

openCV自体にtkinterのGUI上に画像を表示させる機能は無いみたいです。ネット上ではopenCVで取り込んだ画像をPILLOWを用いてtkinter上に表示する記事が多いですが、我々診療放射線技師はmatplotlibを用いて表示した方が何かと便利だと思いますので今回はmatplotlibを用いた方法を紹介します。


広告
デル株式会社

流れ

前々回の記事での流れと同様となります。

  1. 画像をopenCVで読み込む
  2. matplotlibの表示設定を行う
  3. tkinterのcanvas設定を行う


広告
HP Directplus -HP公式オンラインストア-

注意点

今回注意しなければならない点が1点あります。

それは、openCVで取り込んだ画像はBlue,Green,RedのBGR順での色情報となっています。しかし、matplotlibやPILLOWではRed,Green,BlueのRGB順で色情報が入っていますので、その順番を変えてあげる必要があります。

ちなみに、入れ替えずに画像表示をすると以下の画像となります。
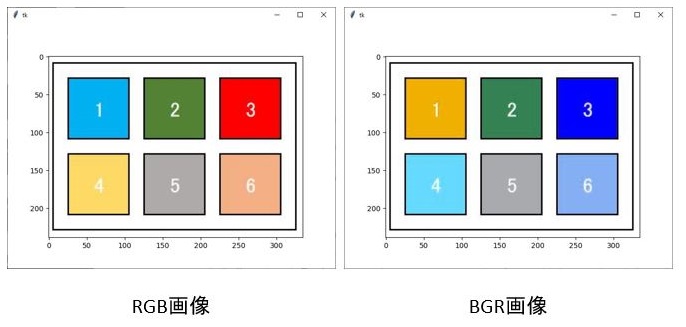
左画像がオリジナル。右画像がBGRでの表示

上の図を見てみると、「3」の背景色左のRGB画像では赤ですが、右のBGR画像では青に入れ替わっています。「1」と「4」の背景色も入れ替わっていますね。

それでは、どのように変更するかというと

img_rgb = cv2.cvtColor(img_bgr, cv2.COLOR_BGR2RGB)

cv2.cvtColorといったコードを用いて、BGRからRGBに変更することができます。

ちなみに、BGR2RGBの2はタイプミスではありませんのであしからず。toの意味です。ちなみにグレイスケールに変更する場合はBGR2GLAYでできます。


広告
BTOパソコン・パソコン関連商品がお買い得!パソコン工房のセール

コード

完成コードは以下となります。


最後に

いかがでしたか?

次回は、openCVの機能をtkinterのボタンウイジェットに組み込むという事をやってみたいと思います。

お疲れ様でした。

広告
上新電機 パソコン買取サービス