Notice: Function _load_textdomain_just_in_time was called incorrectly. Translation loading for the all-in-one-seo-pack domain was triggered too early. This is usually an indicator for some code in the plugin or theme running too early. Translations should be loaded at the init action or later. Please see Debugging in WordPress for more information. (This message was added in version 6.7.0.) in /virtual/mcu03iphuk/public_html/radiology-technologist.info/wp-includes/functions.php on line 6114

Notice: Function _load_textdomain_just_in_time was called incorrectly. Translation loading for the easy-fancybox domain was triggered too early. This is usually an indicator for some code in the plugin or theme running too early. Translations should be loaded at the init action or later. Please see Debugging in WordPress for more information. (This message was added in version 6.7.0.) in /virtual/mcu03iphuk/public_html/radiology-technologist.info/wp-includes/functions.php on line 6114

Notice: Function _load_textdomain_just_in_time was called incorrectly. Translation loading for the urvanov-syntax-highlighter domain was triggered too early. This is usually an indicator for some code in the plugin or theme running too early. Translations should be loaded at the init action or later. Please see Debugging in WordPress for more information. (This message was added in version 6.7.0.) in /virtual/mcu03iphuk/public_html/radiology-technologist.info/wp-includes/functions.php on line 6114

Notice: Function _load_textdomain_just_in_time was called incorrectly. Translation loading for the breadcrumb-navxt domain was triggered too early. This is usually an indicator for some code in the plugin or theme running too early. Translations should be loaded at the init action or later. Please see Debugging in WordPress for more information. (This message was added in version 6.7.0.) in /virtual/mcu03iphuk/public_html/radiology-technologist.info/wp-includes/functions.php on line 6114

Notice: Function _load_textdomain_just_in_time was called incorrectly. Translation loading for the advanced-ads domain was triggered too early. This is usually an indicator for some code in the plugin or theme running too early. Translations should be loaded at the init action or later. Please see Debugging in WordPress for more information. (This message was added in version 6.7.0.) in /virtual/mcu03iphuk/public_html/radiology-technologist.info/wp-includes/functions.php on line 6114

Notice: 関数 _load_textdomain_just_in_time が誤って呼び出されました。lancr ドメインの翻訳の読み込みが早すぎました。これは通常、プラグインまたはテーマの一部のコードが早すぎるタイミングで実行されていることを示しています。翻訳は init アクション以降で読み込む必要があります。 詳しくは WordPress のデバッグをご覧ください。 (このメッセージはバージョン 6.7.0 で追加されました) in /virtual/mcu03iphuk/public_html/radiology-technologist.info/wp-includes/functions.php on line 6114
exe化、python3.7は対応しておらず仮想環境構築してみた。 | 診療放射線技師がPythonをはじめました。

exe化、python3.7は対応しておらず仮想環境構築してみた。

はじめに

こんにちは。前回、匿名化ソフトを作りましたがpythonのバージョンが3.7の場合はexe化できたとしてもエラーが出て使えなかったと思います。実は、私の環境も3.7でexe化してもエラーが出て使えませんでした。

exe化してもエラーがでて使えず・・・・・

いろいろとググってみたのですが、いい解決方法がみつからず結局pyrhonのバージョンを3.6の環境を構築して対策しましたので、その方法を書いてみたいと思います。


広告
デル株式会社

仮想環境とは

そのそも仮想環境とは何なのかということですが、さまざまなライブラリー(numpyとか、openCv等)はいろんなライブラリーと共に使っていくわけなのですが、常に最新のバージョンに対応しているわけではありません。そのため、それぞれのライブラリーがきちんと動くバージョンの環境を構築しなくてはいけません。

今回のexe化もpyinstallerがpython3.7だときちんと動かないのでpython3.6の環境を作ってあげる。それも仮想環境を構築するという事です。


広告
HP Directplus -HP公式オンラインストア-

仮想環境を構築する

python3.6の環境を構築していきたいと思います。

まず、python3.6のバージョンが入っているか確認してみます。PyCharmを立ち上げて初めの画面の下、構成をクリックして「設定」に入ります。

左メニューの「pythonインタープリタ」を選択後、「プロジェクト・インタープリター」の右側下矢印を押して「追加」をクリック

左「Conda Environment」を選択「pythonのバージョン」をクリックして3.6があるか確認します。

この後はコマンドプロンプトでの作業になります。

コマンドプロンプトを立ち上げ

conda create -n 構築する名前 python = 3.6

のコマンドを打ちます。今回は名前をv3.6、pythonのバージョンを3.6で構築したいので最後にpython = 3.6と付け足します。

途中、anacondaの新しいバージョンがありますよと言われていますが・・・

新しく作る環境内に入るライブラリーが表示されています。pydicomが入っていないのがここで確認できます。環境構築後にインストールしましょう。

これで良ければ「y」を入力しエンターで環境が構築されます。
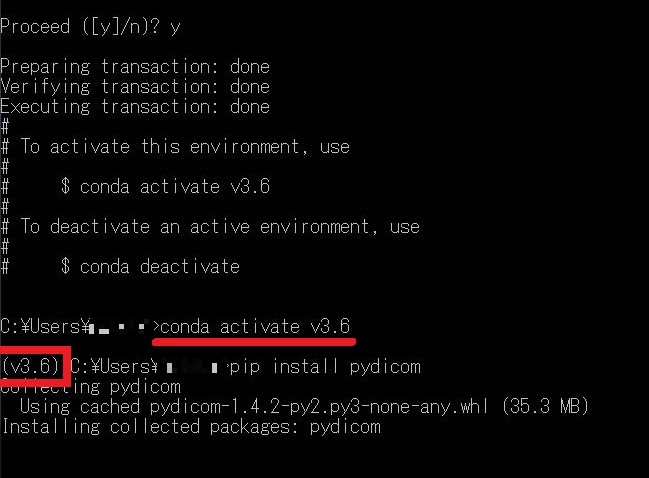
環境構築が無事に終わりました。新しい環境をアクティブにします。

コマンドは

conda activate 環境名  なので

conda activate v3.6

で新しい環境をアクティブにします。先頭に(v3.6)と入っているので環境がアクティブになっているのが確認できます。

そのまま、pydicomのインストールをしてしまいましょう。

pip install pydicom

でインストールです。


広告
BTOパソコン・パソコン関連商品がお買い得!パソコン工房のセール

プロジェクトに仮想環境を適応

PyCharmに戻って、exe化のプログラムのプロジェクトを開きましょう。

「ファイル」で「設定」をクリック。

左「Conda Environment」を選択「既存の環境」右側の「…」をクリックします。anacondaをインストールしたフォルダから「env」を選択すると先ほど構築した環境名のフォルダがあります。その中の「Tools」「python.exe」を選択します。似たフォルダ「pythonw.exe」というフォルダもあるので間違えないように気を付けてください。

これで、「OK」をクリックして完了です。


さいごに

前回の、匿名化のプログラムが動かなかった方は前回の記事にそってexe化を試してみてください。きちんと動くプログラムが出来上がっていると思います。

おつかれさまでした。


環境

  • windows10
  • python3.6.1
  • Anaconda custom(64-bit)
  • PyCharm2020.2(Communication Edition)

広告
上新電機 パソコン買取サービス

Categories:

,