Notice: Function _load_textdomain_just_in_time was called incorrectly. Translation loading for the all-in-one-seo-pack domain was triggered too early. This is usually an indicator for some code in the plugin or theme running too early. Translations should be loaded at the init action or later. Please see Debugging in WordPress for more information. (This message was added in version 6.7.0.) in /virtual/mcu03iphuk/public_html/radiology-technologist.info/wp-includes/functions.php on line 6114

Notice: Function _load_textdomain_just_in_time was called incorrectly. Translation loading for the easy-fancybox domain was triggered too early. This is usually an indicator for some code in the plugin or theme running too early. Translations should be loaded at the init action or later. Please see Debugging in WordPress for more information. (This message was added in version 6.7.0.) in /virtual/mcu03iphuk/public_html/radiology-technologist.info/wp-includes/functions.php on line 6114

Notice: Function _load_textdomain_just_in_time was called incorrectly. Translation loading for the urvanov-syntax-highlighter domain was triggered too early. This is usually an indicator for some code in the plugin or theme running too early. Translations should be loaded at the init action or later. Please see Debugging in WordPress for more information. (This message was added in version 6.7.0.) in /virtual/mcu03iphuk/public_html/radiology-technologist.info/wp-includes/functions.php on line 6114

Notice: Function _load_textdomain_just_in_time was called incorrectly. Translation loading for the breadcrumb-navxt domain was triggered too early. This is usually an indicator for some code in the plugin or theme running too early. Translations should be loaded at the init action or later. Please see Debugging in WordPress for more information. (This message was added in version 6.7.0.) in /virtual/mcu03iphuk/public_html/radiology-technologist.info/wp-includes/functions.php on line 6114

Notice: Function _load_textdomain_just_in_time was called incorrectly. Translation loading for the advanced-ads domain was triggered too early. This is usually an indicator for some code in the plugin or theme running too early. Translations should be loaded at the init action or later. Please see Debugging in WordPress for more information. (This message was added in version 6.7.0.) in /virtual/mcu03iphuk/public_html/radiology-technologist.info/wp-includes/functions.php on line 6114

Notice: 関数 _load_textdomain_just_in_time が誤って呼び出されました。lancr ドメインの翻訳の読み込みが早すぎました。これは通常、プラグインまたはテーマの一部のコードが早すぎるタイミングで実行されていることを示しています。翻訳は init アクション以降で読み込む必要があります。 詳しくは WordPress のデバッグをご覧ください。 (このメッセージはバージョン 6.7.0 で追加されました) in /virtual/mcu03iphuk/public_html/radiology-technologist.info/wp-includes/functions.php on line 6114

Warning: Cannot modify header information - headers already sent by (output started at /virtual/mcu03iphuk/public_html/radiology-technologist.info/wp-includes/functions.php:6114) in /virtual/mcu03iphuk/public_html/radiology-technologist.info/wp-content/plugins/all-in-one-seo-pack/app/Common/Meta/Robots.php on line 87

Warning: Cannot modify header information - headers already sent by (output started at /virtual/mcu03iphuk/public_html/radiology-technologist.info/wp-includes/functions.php:6114) in /virtual/mcu03iphuk/public_html/radiology-technologist.info/wp-includes/feed-rss2.php on line 8
yolov4 | 診療放射線技師がPythonをはじめました。 http://radiology-technologist.info 診療放射線技師のPython日記。解析等で使えるコードを作成、アップしていきたいと思っています。その他いろいろ Sat, 21 May 2022 07:53:22 +0000 ja hourly 1 https://wordpress.org/?v=6.7.1 https://i0.wp.com/radiology-technologist.info/wp-content/uploads/2018/09/cropped-logo5.png?fit=32%2C32 yolov4 | 診療放射線技師がPythonをはじめました。 http://radiology-technologist.info 32 32 164362728 yolov4のセットアップ http://radiology-technologist.info/post-1755 Sat, 21 May 2022 02:23:42 +0000 http://radiology-technologist.info/?p=1755 YOLOのセットアップです。  YOLO […]

The post yolov4のセットアップ first appeared on 診療放射線技師がPythonをはじめました。.]]>
YOLOのセットアップです。

 YOLOはリアルタイムオブジェクト検出アルゴリズムでwebカメラ等からの動画に対してリアルタイムに物体を認識するネットワークです。


流れ

まず、前提条件としてVisualStudio2019がインストールされていることと、cmakeがインストールされている必要があります。

その前提条件が整っている条件の元、流れは以下になります。

1.openCVのインストール

2.yoloの環境構築となります。


広告
デル株式会社

openCVのインストール

まずは、openCVのインストールです。

以下のサイトに行ってダウンロードをします。

https://opencv.org/


上の「Library]から「Release」を選択し「Windows」を選択します。


そうすると、画面が変わります。

画面中央の数字が0になるとダウンロードが始まりますので少し待ちましょう。


ダウンロードが完了したら、展開します。

展開場所はどこでも構いませんが展開後にCドライブ直下に移動しますので、初めからCドライブ直下を指定しました。

これで、openCVのインストールは完了ですが、続いてPathの設定に入ります。


openCVのPath設定

環境設定の画面開き方は以前、記事にしていますので以下を参照にしてください。

http://radiology-technologist.info/post-1699

「システムの環境設定」のPathを選択して「編集」をクリック

「新規」のボタンを押して以下のPathを追加します。

C:\opencv\build\bin

C:\opencv\build\x64\vc15\bin

これで、openCVのセットアップは完了です。

広告
HP Directplus -HP公式オンラインストア-


yoloのセットアップ

今回使用するプログラムはGitHubで公開されている、AlexABさんのDarknetを使用します。

https://github.com/AlexeyAB

画面中央、やや上の「darknet」をクリックします。

プログラムをcloneしてもいいのですが、今回はZIPファイルをダウンロードする方法でやっていきます。(ただ、cloneの方法を記載するのが面倒なだけですが・・・・)

まずは、セットアップしていく上での必要条件を確認しておきましょう。

https://github.com/AlexeyAB/darknet#requirements-for-windows-linux-and-macos

に記載があります。トラブル防止のため、確認しておきましょう。

確認が出来たら以下の部分に進みます。


https://github.com/AlexeyAB/darknet#how-to-compile-on-windows-using-cmake

確認が出来たら、プログラムをダウンロード。ダウンロードが完了したら 好きな場所に 展開しましょう。


CMake

その後、CMakeを立ち上げます。上の画像の赤い四角「look at image」をクリックすると下の画像が出てきますので。CMakeの設定をしていきます。

進んでいくと以下の画面になります。GPUを使用する場合には以下の部分で

ENABLE_CUDA

ENABLE_CUDNN

ENABLE_OPENCV

ENABLE_CUDNN_HALF

の4つにチェックが入っているか確認します。
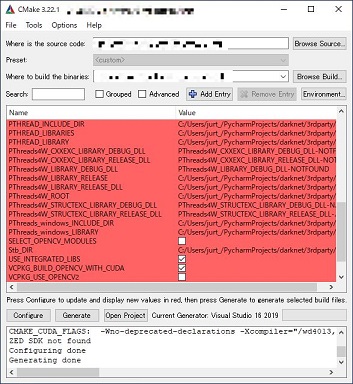
各金が出来たら再度、「Configure」「Generate」とクリックしていきます。

ログの部分に「Generating done」と出たら完了です。


VisualStudioでビルド

続いてBuildをしていきます。ここで躓く方がいるので慎重に行きましょう。

まずはVisualStudioを立ち上げます。今回は2019を使用します。

立ち上げたら「プロジェクトやソリューションを開く」を選択します。

そうすると、ダイアログが開きますので

\darknet-master\build\darknet \ darknet.sln

を選択します。このファイルですが、

フォルダの第1階層にもDarknet.slnというファイルがあります。間違えないようにしてください。

初めのDが大文字のファイルではなく、小文字のファイルです。

プラットフォームツールセットが合っていないと以下の画面が出ることがありますのでその場合はOKを押してください

まずは、CUDAとの依存関係を確認しておきます。

「ソリューションエクスプローラー」内の「darknet」を右クリックし「ビルドの依存関係」

「ビルドのカスタマイズ」を選択します。

CUDA11.1となっているのを確認します。ここで表示がない場合は、CUDAの再インストールを行ってください。

続いてプロパティーの設定をしていきます。

先ほど同様に一番下のプロパティーを選択します。

左側「C/C++」の「全般」を選択

右側で「追加のインクルードディレクトリー」の右側にある下矢印を押します。

$(OPENCV_DIR)¥include

の部分にopenCVのincludeフォルダを指定します。

私の場合は C:\opencv\build\include です。

その他も同様に

$(CudaToolkitincludeDir) ⇒ C:\Program Files\NVIDIA GPU Computing Toolkit\CUDA\v11.1\include

$(CUDNN)¥include ⇒ C:\Program Files\NVIDIA GPU Computing Toolkit\CUDA\v11.1\include

$(cudnn)¥include  ⇒ C:\Program Files\NVIDIA GPU Computing Toolkit\CUDA\v11.1\include

に書き換えをします。


続いてリンカーの設定です。

左側の「リンカー」の「全般」を選択

右側に「追加のライブラリーディレクトリー」の部分を編集していきます。


$(OPENCV_DIR)¥x64¥vc15¥lib ⇒ C:\opencv\build\x64\vc15\lib

$(OPENCV_DIR)¥x64¥vc14¥lib ⇒ C:\opencv\build\x64\vc14\lib

$(CUDA_PATH)¥lib¥$(PlatformName) ⇒ C:\Program Files\NVIDIA GPU Computing Toolkit\CUDA\v11.1\lib\x64

$(cudnn)¥lib¥x64 ⇒ C:\Program Files\NVIDIA GPU Computing Toolkit\CUDA\v11.1\lib\x64

と編集していきます。


これで、編集作業は終了となります。

最後に、ソリューションの「darknet」を右クリックして「ビルド」をクリックすると、ビルドが始まります。

きちんと終了していると

========== ビルド: 1 正常終了、0 失敗、0 更新不要、0 スキップ ==========


の様な表記になっているはずです。

「x64」のフォルダに「darknet.exe」のファイルができていれば成功です。


広告
BTOパソコン・パソコン関連商品がお買い得!パソコン工房のセール

動作確認

それでは、動作確認をしてみましょう。

コマンドプロンプトを起動して、

darknetのフォルダーの「x64」の階層まで移動します。

\darknet-master\build\darknet\x64

コマンドラインでの使い方は

https://github.com/AlexeyAB/darknet#how-to-use-on-the-command-line

に記載がありますが

./darknet detector test cfg/coco.data cfg/yolov4.cfg yolov4.weights -thresh 0.25

のまま入力するとエラーになってしまいますので、頭の部分を書き換えます。

darknet.exe detector test cfg/coco.data cfg/yolov4.cfg yolov4.weights -thresh 0.25

このコマンドの中で、重みファイルに 「yolov4.weights」を指定していますが、フォルダ内にその重みは入っていないのでダウンロードしてくる必要があります。

https://github.com/AlexeyAB/darknet#how-to-evaluate-ap-of-yolov4-on-the-ms-coco-evaluation-server

上手のどちらかからダウンロードして「x64」のフォルダに入れておきます。

それでは、コマンドプロンプトで、

darknet.exe detector test cfg/coco.data cfg/yolov4.cfg yolov4.weights -thresh 0.25

のコマンドを打ち込んでみましょう。

ずらずらとコードが走った後に「Enter Image Path:」と聞かれるので「x64」フォルダ内にある

dog.jpgを入力すると

よく見かける画像が表示されます。

ご自分の画像で試したいときは、画像のフルパスを入力してあげればネットワークにかけることができます。

以上で環境は無事に構築できました。


最後に

いかがでしたか?私は環境構築ですごく苦しんでしまいましたが、AlexABさんのGitHubのページに書いてある通りにやれば大体うまくいきます。

みなさん、頑張ってください。

広告
上新電機 パソコン買取サービス
The post yolov4のセットアップ first appeared on 診療放射線技師がPythonをはじめました。.]]>
1755