Notice: Function _load_textdomain_just_in_time was called incorrectly. Translation loading for the all-in-one-seo-pack domain was triggered too early. This is usually an indicator for some code in the plugin or theme running too early. Translations should be loaded at the init action or later. Please see Debugging in WordPress for more information. (This message was added in version 6.7.0.) in /virtual/mcu03iphuk/public_html/radiology-technologist.info/wp-includes/functions.php on line 6114

Notice: Function _load_textdomain_just_in_time was called incorrectly. Translation loading for the easy-fancybox domain was triggered too early. This is usually an indicator for some code in the plugin or theme running too early. Translations should be loaded at the init action or later. Please see Debugging in WordPress for more information. (This message was added in version 6.7.0.) in /virtual/mcu03iphuk/public_html/radiology-technologist.info/wp-includes/functions.php on line 6114

Notice: Function _load_textdomain_just_in_time was called incorrectly. Translation loading for the urvanov-syntax-highlighter domain was triggered too early. This is usually an indicator for some code in the plugin or theme running too early. Translations should be loaded at the init action or later. Please see Debugging in WordPress for more information. (This message was added in version 6.7.0.) in /virtual/mcu03iphuk/public_html/radiology-technologist.info/wp-includes/functions.php on line 6114

Notice: Function _load_textdomain_just_in_time was called incorrectly. Translation loading for the breadcrumb-navxt domain was triggered too early. This is usually an indicator for some code in the plugin or theme running too early. Translations should be loaded at the init action or later. Please see Debugging in WordPress for more information. (This message was added in version 6.7.0.) in /virtual/mcu03iphuk/public_html/radiology-technologist.info/wp-includes/functions.php on line 6114

Notice: Function _load_textdomain_just_in_time was called incorrectly. Translation loading for the advanced-ads domain was triggered too early. This is usually an indicator for some code in the plugin or theme running too early. Translations should be loaded at the init action or later. Please see Debugging in WordPress for more information. (This message was added in version 6.7.0.) in /virtual/mcu03iphuk/public_html/radiology-technologist.info/wp-includes/functions.php on line 6114

Notice: 関数 _load_textdomain_just_in_time が誤って呼び出されました。lancr ドメインの翻訳の読み込みが早すぎました。これは通常、プラグインまたはテーマの一部のコードが早すぎるタイミングで実行されていることを示しています。翻訳は init アクション以降で読み込む必要があります。 詳しくは WordPress のデバッグをご覧ください。 (このメッセージはバージョン 6.7.0 で追加されました) in /virtual/mcu03iphuk/public_html/radiology-technologist.info/wp-includes/functions.php on line 6114

Warning: Cannot modify header information - headers already sent by (output started at /virtual/mcu03iphuk/public_html/radiology-technologist.info/wp-includes/functions.php:6114) in /virtual/mcu03iphuk/public_html/radiology-technologist.info/wp-content/plugins/all-in-one-seo-pack/app/Common/Meta/Robots.php on line 87

Warning: Cannot modify header information - headers already sent by (output started at /virtual/mcu03iphuk/public_html/radiology-technologist.info/wp-includes/functions.php:6114) in /virtual/mcu03iphuk/public_html/radiology-technologist.info/wp-includes/feed-rss2.php on line 8
pycharm | 診療放射線技師がPythonをはじめました。 http://radiology-technologist.info 診療放射線技師のPython日記。解析等で使えるコードを作成、アップしていきたいと思っています。その他いろいろ Wed, 10 Feb 2021 23:47:50 +0000 ja hourly 1 https://wordpress.org/?v=6.7 https://i0.wp.com/radiology-technologist.info/wp-content/uploads/2018/09/cropped-logo5.png?fit=32%2C32 pycharm | 診療放射線技師がPythonをはじめました。 http://radiology-technologist.info 32 32 164362728 PyCharm 新規ファイル作成時の定型文を作る http://radiology-technologist.info/post-676 Sat, 23 May 2020 12:54:12 +0000 http://radiology-technologist.info/?p=676 はじめに 新規でファイルを作成しコードを書き始める […]

The post PyCharm 新規ファイル作成時の定型文を作る first appeared on 診療放射線技師がPythonをはじめました。.]]>
はじめに

新規でファイルを作成しコードを書き始める際、まずはimport文を書くことになるのですが、私はそれが面倒でなりません。そのため、テキストファイルに定型文を作成し、新規作成時にそれをコピーすることをしていたのですがそんなことをせずとも、PyCharmの機能で定型文を作成しておく機能があったのでそれを紹介したいと思います。


広告
デル株式会社

定型文作成方法

まずは、上部メニューバーの「ファイル」→「設定」を選択します。

その後、出てきたウインドウ左側の「エディター」→「ファイルおよびコード・テンプレート」を選択します。
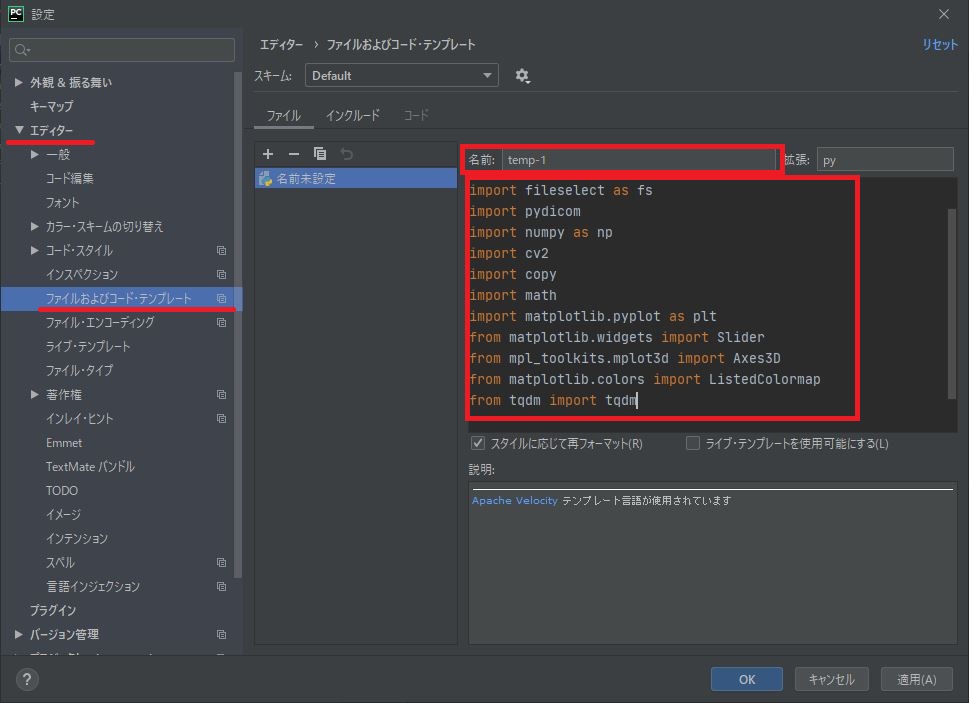
右側の赤枠「名前」の中に定型文の名前を入力し、その下のウインドウに定型文として入力したいコードを記入します。入力が終わったら「OK」をクリック。

それだけです。


広告
HP Directplus -HP公式オンラインストア-

新規ファイル作成

それでは、新規にファイルを作成してみましょう。

上部メニューより「ファイル」→「新規」を選択
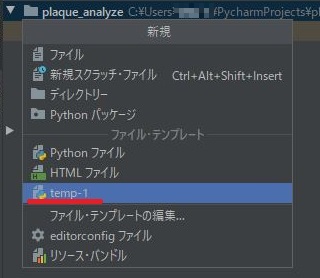
真ん中あたりに、先ほど作成した定型文の名称があります。

それを選択していただくと先ほど作成した定型文が展開されます。
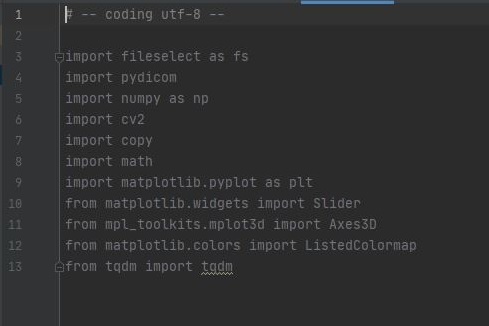
非常に楽になりました。

是非とも使ってみてください。


広告
BTOパソコン・パソコン関連商品がお買い得!パソコン工房のセール

最後に

定型文のimportは使うであろうライブラリーのモジュールを全て入力しておき、コードが完成したら使用していない(import文の色が付いていない)モジュールを消去していくのが一番楽なのかもしれませんね。


環境

  • windows10
  • python3.6.1
  • Anaconda custom(64-bit)
  • PyCharm2020.2(Communication Edition)

広告
上新電機 パソコン買取サービス
The post PyCharm 新規ファイル作成時の定型文を作る first appeared on 診療放射線技師がPythonをはじめました。.]]>
676
Pythonインストール http://radiology-technologist.info/post-15 http://radiology-technologist.info/post-15#respond Sun, 07 Oct 2018 12:25:14 +0000 http://mcu03iphuk.m5.valueserver.jp/wordpress/?p=15 Pythonインストールの種類 インストール方法は […]

The post Pythonインストール first appeared on 診療放射線技師がPythonをはじめました。.]]>

Pythonインストールの種類

インストール方法は2種類あります。一つはpython単体をインストールする方法。で、追加で様々なモジュールをインストールする必要があります。もう一つは、anacondaといって科学計算用の様々なモジュールがセットになって一括インストールできるものとなります。一般的にはanacondaをインストールしてしまった方が楽です。私自身も、anacondaをインストールしました。


anacondaのインストール

anacondaのインストールです。まずは、以下のサイトに行ってanacondaをダウンロードしてきます。Pythonの2系は開発が終了していますのでこれからPyhonを勉強しようとしている方はPyhon3系をインストールした方がいいです。

Anaconda Indivisual Edition

ページを少し下げると上のような部分があります。Python3.X ご自分のパソコンの仕様と合うものをダウンロードしてください。

ダウンロードが完了しましたら、そのファイルをダブルクリックしてインストーラーを起動します。

「Next」で次に進みます。


利用規約です。「I Agree」で次に進みます。


利用者の範囲です。個人使用の場合は「Just Me」


インストール先にこだわりのない方はデフォルトのままで「Next」


anacondaを初めてインストールされる方なら上のチェックボックスにも入れた方がパスの設定をしなくて済むので楽です。


インストールが始まります


終了しました


その後、コマンドプロンプトを立ち上げて「Python」と打ち込んで、Enter押すと、以下のような表示になれば正常にインストールができています。


コードエディタのPycharmのインストール

このPycharmのサイトに行って「Community」版をダウンロードします。

ダウンロードが完了したらファイルをダブルクリック


インストーラが起動します。


プライバシーポリシーに同意します。


開発者にエラー等の情報を送信しますか?との質問。私は「Don’t Send」を選択しました。


インストールが完了すれば、立ち上がってきます。


広告
デル株式会社

Pycharmを日本語化

私は日本語の方が楽なので日本語化しています。

Pleiades All in one Eclipseのページへ行ってWindows版をダウンロードしてきます。
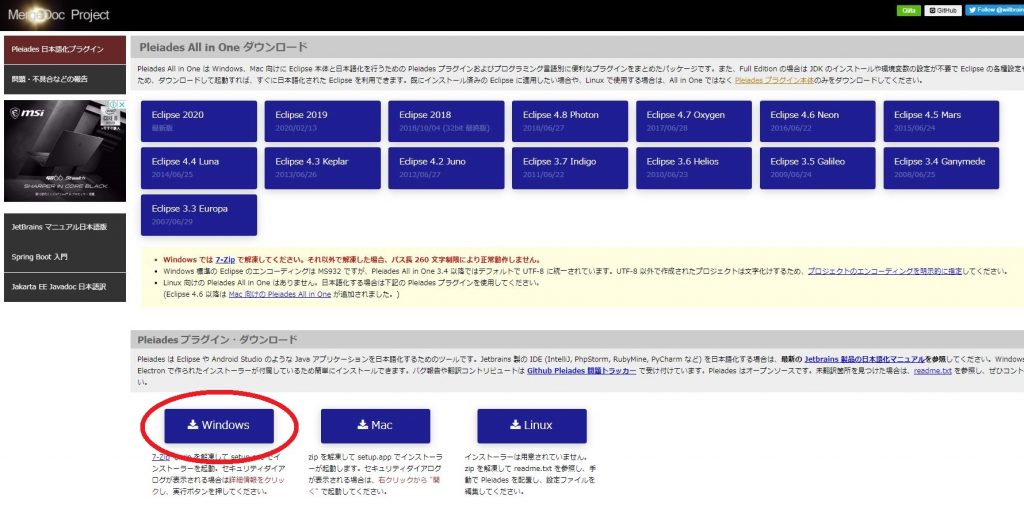
ダウンロードしてきたファイルをデスクトップ上に移動して解凍します。(Windowsデフォルトの解凍ソフトだとうまくいかない場合がありますのでLhaplus等のソフトを使って解凍してください。)

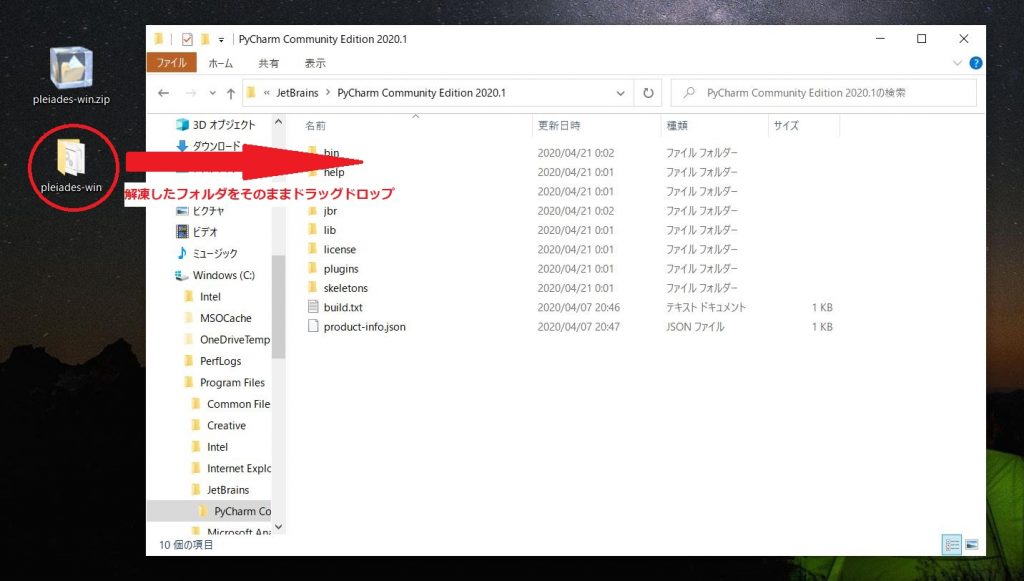
解凍したフォルダをそのままPycharm Community Editionのフォルダに入れます。

Pycharm Community Editionのパスは私の場合以下となります。

C:\Program Files\JetBrains\PyCharm Community Edition 2020.1

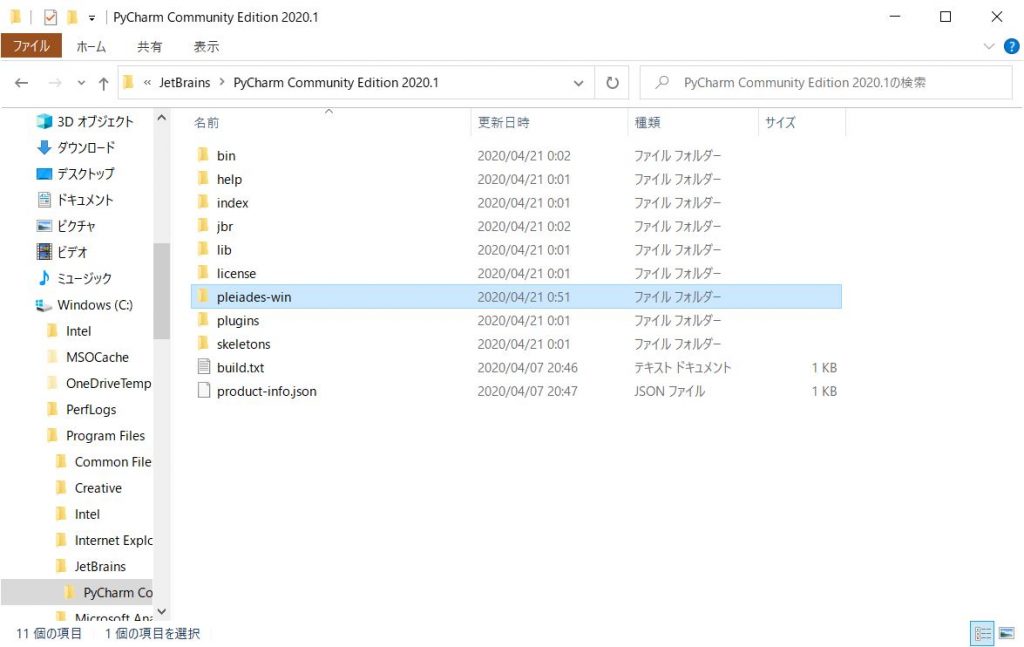
移動した後です。その後、Pycharmを起動します。

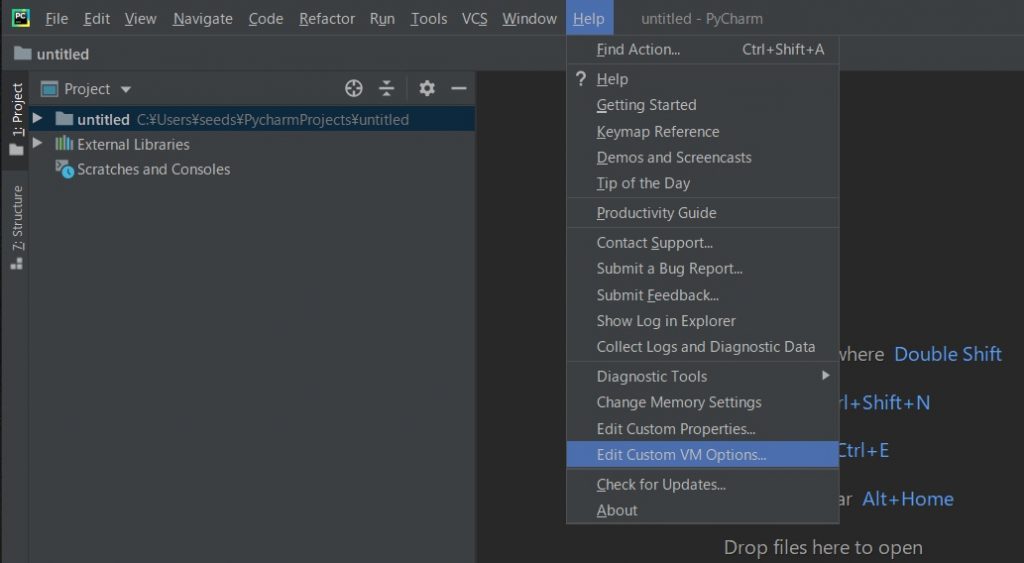
「Help」 → 「Edit Custom VM Options」を選択。

一番最後の行に以下の分を挿入します。

-Xverify:none

-javaagent:C:\Program Files\JetBrains\PyCharm Community Edition 2020.1\pleiades-win\plugins\jp.sourceforge.mergedoc.pleiades\pleiades.jar

なお、追加した2行目のパスが間違っていると起動しなくなってしまうので、ご自分のインストール環境に合わせて修正してください。

終わったら、再度Pycharmを起動してください。

日本語化していますか?
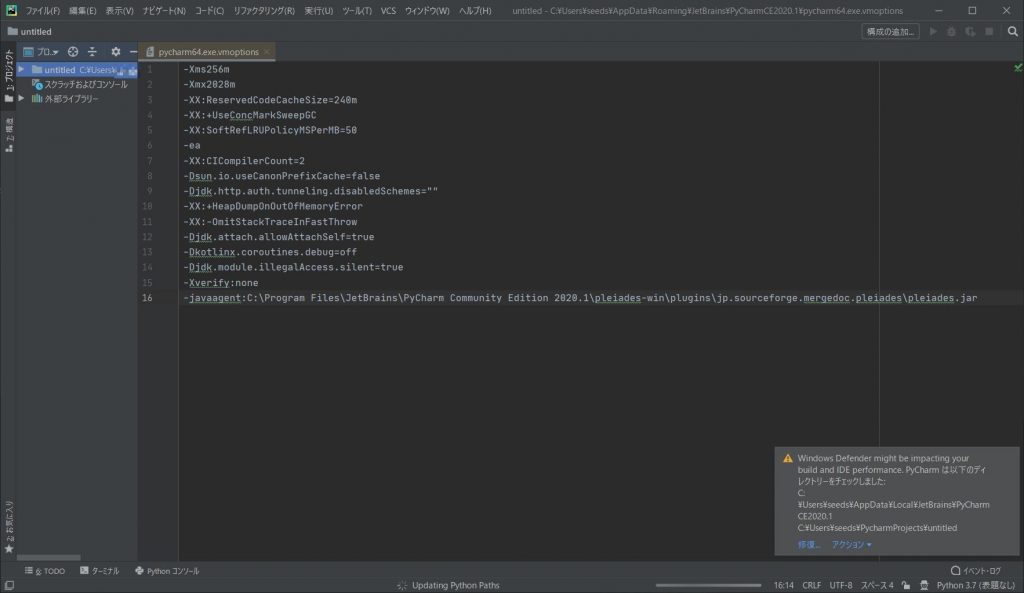

もし、起動しない場合はVMoptionのファイルを書き換えます。pycharmをデフォルトのままでインストールしている場合は以下のフォルダにvmoptionのファイルがあります。

C:\Users\ユーザー名\AppData\Roaming\JetBrains\PyCharmCE*****

最後の***はPycharmのバージョンが入ります。

そこのpycharm64.exeを右クリックして「プログラムから開く」→「メモ帳」

で開けば、修正できます。

いかがでしたか?普段のプログラムをインストールするのとはちょっと違って手間取ったかもしれませんがこれで、開発環境は整いました。

それでは、これからも頑張っていきましょう。


追伸

本記事は2020年4月21日パソコン買い替えに伴い記事の書き直しを行いました。

広告
上新電機 パソコン買取サービス
The post Pythonインストール first appeared on 診療放射線技師がPythonをはじめました。.]]>
http://radiology-technologist.info/post-15/feed 0 15