さて、今回は畳み込みフィルタをやってみたので記事にしていきます。
お恥ずかしい話、1,2年ぐらい前までよく分かっていませんでした・・・・・
深層学習を勉強するようになってやっと少しずつ理解できるようになってきました。。。。
学生時代、きちんと勉強していなかった事を後悔しています。
それでは本題に入っていきます。
カーネルとは
フィルタはカーネルといわれる配列で指定していきます。
3×3や、5×5といった縦横同一サイズのカーネルで指定していきます。
カーネルの種類
カーネルの種類は無数にあります。
ただ、カーネルの設定次第で鮮鋭化であったり平滑化であったり、エッジ検出であったりといろいろとできます。
その目的とする効果によってカーネルの組み方が変わってきます。
例えば、鮮鋭化であれば隣り合うピクセルの差が大きければ、くっきりとした画像になります。
その為、以下のように中心に接する値にマイナスの値を設定してあげれば鮮鋭化することができます。

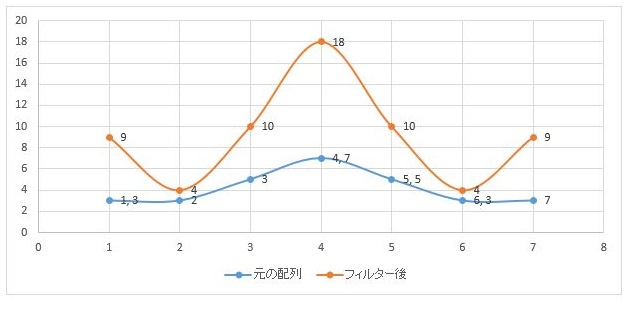
例えば、1次元で試してみましょう。元の配列3,3,5,7,5,3,3という配列があり
それにー1,4,ー1というカーネルを掛け合わせてみると下の様な結果になります。

上記結果をグラフとして表示してみると、下の図の黄色のグラフになり、鮮鋭化されているのが分かります。
逆に、平滑化であれば
の様にしてあげれば平滑化、いわゆる少しボケたような画像が出来上がります。
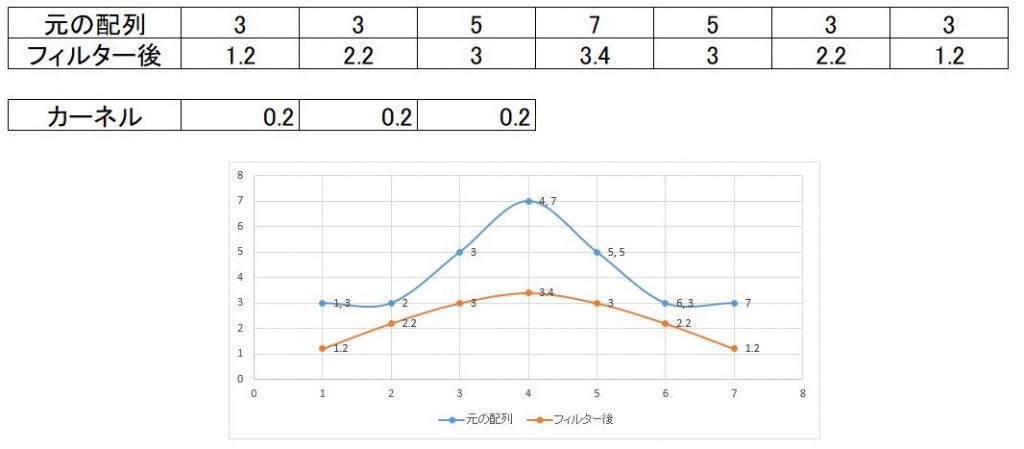
なおフィルタの値は合計で1を超えると明るめの画像となり、1以下であれば暗めの画像になってしまいます。
先の鮮鋭化のフィルタでは1を超えてしまっているので全体的に信号が高くなっています。逆に平滑化のフィルタでは1より小さくなっているので信号は元の青いグラフより低くなっています。
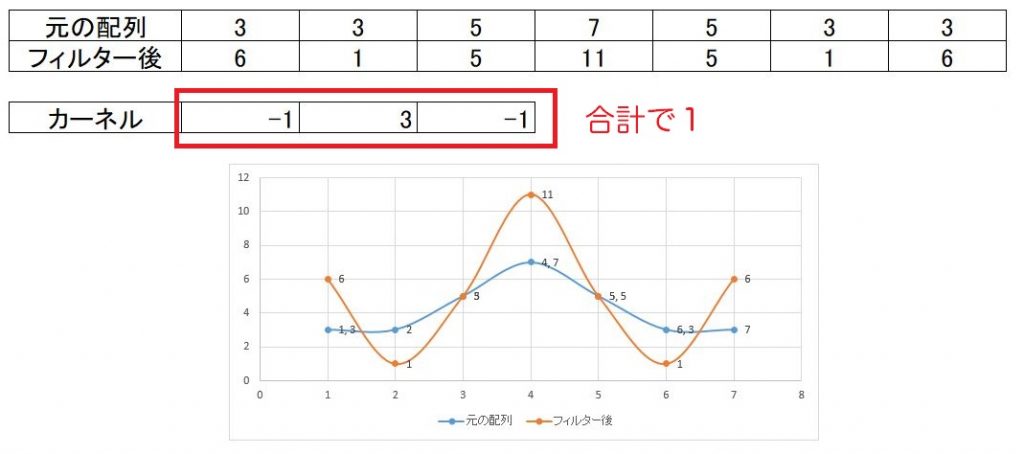
以下では、鮮鋭化フィルタで合計を1にした場合です。平均すると元の値とほぼ変わりません
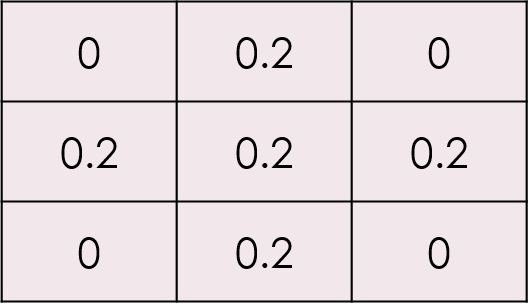
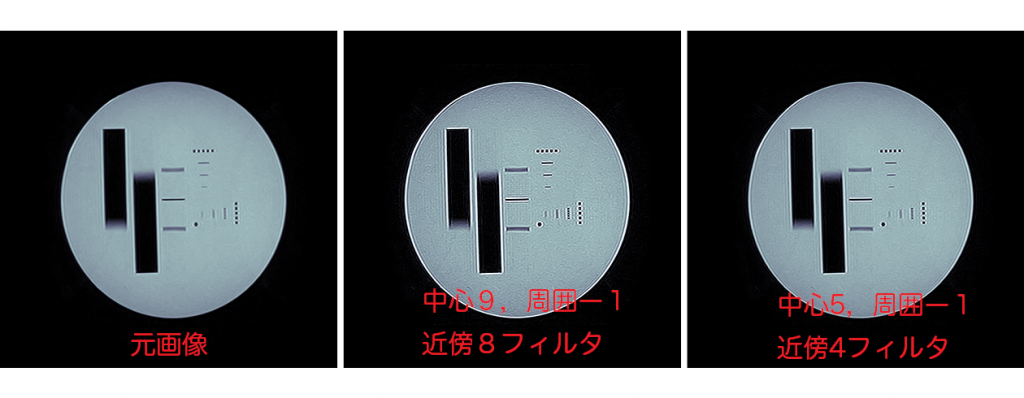
上記説明では中心から上下左右の4近傍のフィルタで説明しましたが
その他に、上下左右と斜めにも値を入れた8近傍フィルタもあります。
コード
それでは実際のコードです。今回はopenCVを用いて行います。
cv2.filter2D(元画像の配列, -1, kernel)
で畳み込みフィルタができます。
なお、引数に関してはこれ以外にももう少しあるようです。気になる方はgoogle先生にお尋ねください。
今回、私が試してみたコードが以下になります。
import numpy as np
import pydicom
import matplotlib.pyplot as plt
import cv2


def main():


    filenames = "MR000002"
    dcm = pydicom.dcmread(filenames)


    window_center , window_width = dcm[0x0028,0x1050].value,  dcm[0x0028,0x1051].value
    ww_low, ww_high  = int(window_center) - int(window_width) // 2, int(window_center) + int(window_width) // 2

    pix_arr = dcm.pixel_array
    pix_arr_fil1 = dcm.pixel_array
    pix_arr_fil2 = dcm.pixel_array

    mag1, k1  = 9, -1
    mag2, k2, k0 = 5, -1, 0

    kernel8 = np.array([[k1, k1, k1],
                       [k1, mag1, k1],
                       [k1, k1, k1]])

    print(kernel8)

    kernel4 = np.array([[k0, k2, k0],
                        [k2, mag2, k2],
                        [k0, k2, k0]])

    print(kernel4)

    pix_arr_fil1 = cv2.filter2D(pix_arr_fil1, -1, kernel8)
    pix_arr_fil2 = cv2.filter2D(pix_arr_fil2, -1, kernel4)


    fig = plt.figure(figsize=(18, 7))
    ax1 = fig.add_subplot(1, 3, 1)
    ax2 = fig.add_subplot(1, 3, 2)
    ax3 = fig.add_subplot(1, 3, 3)

    plt.subplots_adjust(left=0, right=1, bottom=0, top=1, wspace=0.02, hspace=0.005)

    ax1.axes.xaxis.set_visible(False), ax1.axes.yaxis.set_visible(False)
    ax2.axes.xaxis.set_visible(False), ax2.axes.yaxis.set_visible(False)
    ax3.axes.xaxis.set_visible(False), ax3.axes.yaxis.set_visible(False)

    ax1.imshow(pix_arr, cmap='bone', vmin=ww_low, vmax=ww_high)
    ax2.imshow(pix_arr_fil1, cmap='bone', vmin=ww_low, vmax=ww_high)
    ax3.imshow(pix_arr_fil2, cmap='bone', vmin=ww_low, vmax=ww_high)

    plt.show()

if __name__ == '__main__':
    main()
24~26行目に8近傍のカーネル
30~32行目に4近傍のカーネルを設定してあります。
なおカーネルの値はそれぞれ、21行目と22行目で設定できるようにしています。
結果
鮮鋭化フィルタ (画像をクリックすると拡大します)
平滑化フィルタ (画像をクリックすると拡大します)
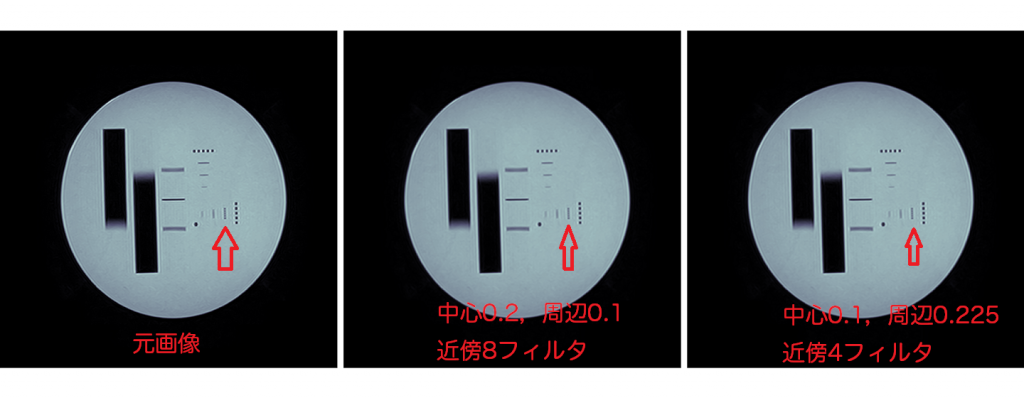
平滑化フィルタはこの画像ではわかりずらいかもしれませんね。興味のある方は他の画像で試してみてください。