例えば、前立腺を抽出するセグメンテーションをしたい場合は、学習画像として、元画像と、前立腺だけを抽出した(下の画像右側)のような画像を作成しなければいけません。

ワークステーションを使えばできるのですが、業務終了後に職場に残ってこの作業、やりたくないですよね。自分なら、家で酒でも飲みながら音楽をかけて作業。を望みます。
なので、今回は、この画像を作成するコードを組んでいきます。
コード
最終的なコードは以下となります。
import numpy as np
import cv2
import pydicom
import matplotlib.pyplot as plt
from matplotlib.patches import Circle

def on_motion(event):
    global contour, fig, ax1

    if event.button == 1 :
        contour.append([int(event.xdata), int(event.ydata)])
        ax1.add_patch(Circle((event.xdata, event.ydata), 0.1, color='r'))
        fig.canvas.draw()


def on_button_release(event):
    global contour, mask, ax2

    cv2.fillConvexPoly(mask, np.array(contour), color=255, lineType=cv2.LINE_AA)

    ax2.imshow(mask, cmap='bone')
    fig.canvas.draw()


def main():
    global contour, fig, ax1, ax2, mask

    dcm = pydicom.dcmread('009_IMG11')
    img = dcm.pixel_array

    mask = np.zeros_like(img, dtype=np.uint8)


    ww, wl = dcm[0x0028, 0x1051].value, dcm[0x0028, 0x1050].value
    ww_l, ww_h = wl - ww // 2, wl + ww // 2

    contour= []

    fig = plt.figure(figsize=(10, 5))
    ax1,ax2 = fig.add_subplot(1, 2, 1), fig.add_subplot(1, 2, 2)

    ax1.imshow(img, cmap='bone', vmin=ww_l, vmax=ww_h)

    fig.canvas.mpl_connect('button_release_event', on_button_release)
    fig.canvas.mpl_connect('motion_notify_event', on_motion)

    plt.show()

if __name__ == "__main__":
    main()
流れの説明
コードの流れとしては
- DICOM画像の表示
- マスク画像の作成(DICOM画像と同一の画像サイズで符号なしの8bit画像)
- DICOM画像で領域指定(右クリックを押したままマウス移動)
- マウスを移動させることでその座標をリストに追加していく
- マウスを離すことで領域抽出完了
- マスク画像に領域を描出
といった流れになっていきます。
上記コードで
DICOM画像の表示はmain関数内
DICOM画像で領域抽出は「on_motion」関数
マスク画像に領域を描出は「on_button_release」関数
で指定しています。
領域抽出
領域抽出は、DICOM画像上で抽出する領域をなぞっていくことでその座標を、リストに登録していきます。
ここでは、numpyの配列としてではなく、リストとして扱っていきます。
numpy配列として、2次元データに2次元データをひとつづつ追加していこうとするとちょっと厄介なことが起こるので。。。。。(詳細はいつか記事にしたいと思っています)
リストとして扱っていけば、純粋にappendで追加していけます。
追加する際に、整数型として追加していきます。
contour.append([int(event.xdata), int(event.ydata)])
また、なぞった位置をDICOM画像上に表示しておきたいので
ax1.add_patch(Circle((event.xdata, event.ydata), 0.1, color=’r’))
で画像上にプロットして
fig.canvas.draw()
で画像を再描出しています。
マスク画像に領域を描出 cv2.fillConvexPoly
なぞった座標のリストを別の画像上に描出します。
上記コードの32行目
mask = np.zeros_like(img, dtype=np.uint8)
でマスク画像用の配列をデータ0で作成しています。
配列の型は、マイナスデータなしの8bit画像です。なので階調は0~255となります。
先ほどなぞって登録したリストをmask上に描出します。
この機能は、openCVを使います。
cv2.fillConvexPoly(mask, np.array(contour), color=255, lineType=cv2.LINE_AA)
この関数は矩形を描出し、その中を塗りつぶします。
ここで先ほどの座標データを使うのですが、受けるデータはnumpy配列で整数型しか受けてくれません。
なので、リストに登録する際にint型を指定して追加していました。
そのリストをnumpy配列に変換するのは
np.array(contour)
としてあげるだけでnumpy配列として扱ってくれます。非常に便利です。
で、3番目の引数で255の値を指定してあげます。もし、RGBで指定するのであれば(0,0,0)等で指定してあげれば大丈夫です。ただ、その際にはmask配列作成時にRGBとして配列を作成することを忘れないようにしてください。
これで、先ほどなぞった座標内を255の値として登録することが出来ました。
後は、画像表示して確認です。
さいごに
いかがですか?このコードだけでは何枚もの教師画像を作成するのは大変ですが、根幹となるコードはできました。
このコードがどなたかの役に立てば幸いです。
The post 画像セグメンテーションに必要な教師データ作成ツールを組んでみた first appeared on 診療放射線技師がPythonをはじめました。.]]>前回、画像領域値をせて値を確認できるプログラムを組んでみたをベースとして画像領域を一つ追加し、4種類の領域抽出できるプログラムを組みました。
今回は、それらプログラムを連結させてプログラムとして完成させましょう。
前回までのプログラム
import tkinter as tk
import cv2
import matplotlib.pyplot as plt
from matplotlib.backends.backend_tkagg import FigureCanvasTkAgg
import numpy as np
import pydicom
import fileselect as fs

def cont():
    img_unit8 = copy.deepcopy(img_arr) #img_unit8としてコピー
    np.clip(img_unit8, ww_low, ww_high, out= img_unit8)
      #コピーした配列の最低値以下をウインドウ幅最低値に、
       # 最高値以上も同様に)

    img_unit8 -= img_unit8.min()
      #配列全体をウインドウ幅最低値を引くことで0からに変更)

    np.floor_divide(img_unit8, (img_unit8.max() + 1) / 256,
            out = img_unit8, casting='unsafe')
      #ウインドウ幅を256分割する。

    cv2.imwrite('./img_8bit.png',img_unit8)

def external():
    img_png = cv2.imread('img_8bit.png')
    thresh_8bit = thresh.astype('u1')
    ret, contours, hierarchy = cv2.findContours(thresh_8bit, 0,   cv2.CHAIN_APPROX_SIMPLE)

    for contour in contours:
        cv2.drawContours(img_png, contours, -1, (255, 255, 0), 1)

    ax3.imshow(img_png, cmap='bone')
    fig.canvas.draw()

def list():
    img_png = cv2.imread('img_8bit.png')
    thresh_8bit = thresh.astype('u1')
    ret, contours, hierarchy = cv2.findContours(thresh_8bit, 1,  cv2.CHAIN_APPROX_SIMPLE)

    for contour in contours:
        cv2.drawContours(img_png, contours, -1, (255, 255, 0), 1)

    ax3.imshow(img_png, cmap='bone')
    fig.canvas.draw()

def ccomp():
    img_png = cv2.imread('img_8bit.png')
    thresh_8bit = thresh.astype('u1')
    ret, contours, hierarchy = cv2.findContours(thresh_8bit, 2, cv2.CHAIN_APPROX_SIMPLE)

    for contour in contours:
        cv2.drawContours(img_png, contours, -1, (255, 255, 0), 1)

    ax3.imshow(img_png, cmap='bone')
    fig.canvas.draw()

def tree():
    img_png = cv2.imread('img_8bit.png')
    thresh_8bit = thresh.astype('u1')
    ret, contours, hierarchy = cv2.findContours(thresh_8bit, 3,   cv2.CHAIN_APPROX_SIMPLE)

    for contour in contours:
        cv2.drawContours(img_png, contours, -1, (255, 255, 0), 1)

    ax3.imshow(img_png, cmap='bone')
    fig.canvas.draw()

def level():
    global ww_low, ww_high, w_level, w_width

    window_level, window_width = level_sc.get(), w_width_sc.get()

    ww_low = window_level - (window_width // 2)
    ww_high = window_level + (window_width // 2)

def window(self):
    global ww_low, ww_high, img_arr, ax1

    level()

    ax1.imshow(img_arr, cmap='bone', vmin=ww_low, vmax=ww_high)
    fig.canvas.draw()

def thresho(self):
    global img_arr, ax2, fig

    ret, thresh = cv2.threshold(img_arr, int(self), 255, cv2.THRESH_BINARY)
    ax2.imshow(thresh, cmap='bone')

    fig.canvas.draw()

def main():
    global ww_low, ww_high, img_arr, thre_sc, ax2, fig,\
        img_arr, ax1, level_sc, w_width_sc, ww_low, ww_high, w_level, w_width


    filename = fs.single_fileselect()
    dcm = pydicom.dcmread(filename)
    img_arr = np.array(dcm.pixel_array)
    w_level = int(dcm[0x0028,0x1050].value)
    w_width = int(dcm[0x0028, 0x1051].value)

    fig = plt.figure(figsize=(12, 6))
    ax1 = fig.add_subplot(1, 3, 1)
    ax2 = fig.add_subplot(1, 3, 2)
    ax3 = fig.add_subplot(1, 3, 3)

    ax1.axes.xaxis.set_visible(False), ax1.axes.yaxis.set_visible(False)
    ax2.axes.xaxis.set_visible(False), ax2.axes.yaxis.set_visible(False)
    ax3.axes.xaxis.set_visible(False), ax3.axes.yaxis.set_visible(False)


    root = tk.Tk()
    root.geometry("1410x600")

    Canvas = FigureCanvasTkAgg(fig, master=root)
    Canvas.get_tk_widget().grid(row=0, column=0, rowspan=10)


    var_scale_level = tk.IntVar()
    level_sc = tk.Scale(root,
        label='Window Level',
        variable=var_scale_level,
        orient=tk.HORIZONTAL,
        length=200,
        from_= np.min(img_arr),
        to=np.max(img_arr),
        command=window)
    level_sc.set(w_level)
    level_sc.grid(row=1, column=1)

    var_scale_w_width = tk.IntVar()
    w_width_sc = tk.Scale(root,
        label = 'Window Width',
        variable=var_scale_w_width,
        orient=tk.HORIZONTAL,
        length=200,
        from_=0,
        to=(np.max(img_arr) - np.min(img_arr))//2,
        command=window)
    w_width_sc .set(w_width)
    w_width_sc.grid(row=3, column=1)


    thre = 0

    var_thre = tk.IntVar()
    thre_sc = tk.Scale(root,
        label='Threshold',
        variable=var_thre,
        orient=tk.HORIZONTAL,
        length=200,
        from_=np.min(img_arr),
        to=np.max(img_arr),
        command=thresho)
    thre_sc.set(thre)
    thre_sc.grid(row=5, column=1)


    ext_but = tk.Button(root, text="EXTERNAL", command=external, width = 10)
    ext_but.grid(row=8, column=1)

    list_but = tk.Button(root, text="LIST", command=list, width = 10)
    list_but.grid(row=8, column=2)

    ccomp_but = tk.Button(root, text="CCOMP", command=ccomp, width = 10)
    ccomp_but.grid(row=9, column=1)

    TREE_but = tk.Button(root, text="TREE", command=tree, width = 10)
    TREE_but.grid(row=9, column=2)

    window(1)
    thresho(1)

    root.mainloop()

if __name__ == "__main__":
    main()
今回の流れ
それでは、今回の流れです。
前回は4つの領域抽出のプログラムを作成しましたが、流れとして繋がっていないのでまずは、これを繋げて動くようにしたいと思います。
その後、領域抽出した面積や、周囲の長さを求めるコードを書いていきたいと思います。
ボタンに関数を紐づける
それぞれのボタンが押された時の動作を紐づけます。
ボタンを作成した際にcommandの引数で指定してあげることで動作を紐づけることが出来ます。
ext_but = tk.Button(root, text=”EXTERNAL”, command=external, width = 10)
作成した4つのボタンに関数の紐づけをしましょう。
領域抽出までのプログラムを繋げる
それでは、繋げていきたいと思います。
領域抽出のボタンが押された際に、まず一番左の画像を汎用画像として保存するプログラムを走らせます。その後に領域抽出を行う必要があります。
関数のexternal,list,ccomp,treeの関数が呼び出された際にまず、contの関数を呼び出し、左側の画像を汎用画像として保存させますので、それぞれの関数の初めに
cont()
と4つの関数の初めに入力しておきましょう。
そして、保存した画像を読み込みます。
img_png = cv2.imread(‘img_8bit.png’)
これで、プログラムが動くようになりました。
抽出領域の面積、長さを求める
抽出した領域の面積は、
cv2.contourArea()
周囲の長さを求めるのは
cv2.arcLength()
で求めることが出来ます。ただ、この関数の場合は第2引数が必要で、閉じている線(True)か閉じていない線(False)なのかを指定してあげる必要があります。
ちなみに、重心を求めるのは
cv2.moments()
で求めることが出来ます。
それぞれ、引数にはcontoursの何番目のデータかを指定する必要があります。
それでは、これも関数として作成しましょう。
関数名はcont_momentとして作成しました。
その際、それぞれの領域抽出した結果を引数として受けることにします。
後は、for文で回して格納してある分だけプロントアウトしていくだけです。
def cont_moment(contours):
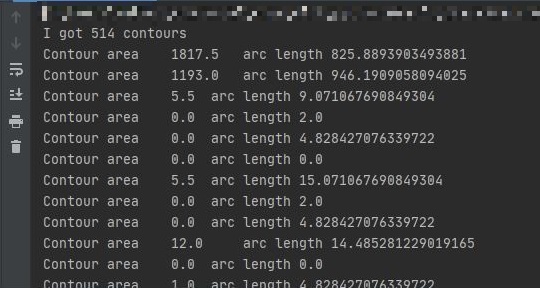
    print('I got ' + str(len(contours)) + ' contours')

    for i in range(len(contours)):
        print('Contour area\t' + str(cv2.contourArea(contours[i])) + '\t arc length\t' + str(cv2.arcLength(contours[i],True)))
そして、4つの領域抽出の関数の最後に
cont_moment(contours)
を追加します。
値を微調整できるボタンを設置
私のコードがいけないのか、パソコンのスペックが低いのか、スライダーを動かすと動作がカクついてしまうので5程度づつ調整できるボタンを設置したいと思います。
ボタンの設置は領域抽出の時と同じです。
例えば、ウインドウレベルの場合は以下の様にボタンの設置を行います。
down_wl_btn = tk.Button(root, text="down", command=down_wl)
down_wl_btn.grid(row=2, column=1)

up_wl_btn = tk.Button(root, text=" up ", command=up_wl)
up_wl_btn.grid(row=2, column=2)
コマンドの関数は以下になります。
def down_wl():
    val = level_sc.get() - 5
    level_sc.set(val)

def up_wl():
    val = level_sc.get() + 5
    level_sc.set(val)
現在のスケールの値とそこから増減したい数値を増減した値(今回は5増減)をvalという変数に持たせ、それをスケールの値にセットする形になります。
スケールにセットするやり方は
スケール名.set(値)
で出来ます。
ウインドウ幅、閾値に関しても同様に作成してください
追加
忘れていました・・・・・
画像領域を追加した際にax3を追加しました。
しかし、このax3はmain関数の中で宣言していますので、他の関数では使うことが出来ませんのでグローバル宣言をしておきましょう。
main関数 def main(): のすぐ下にglobalと記載がありますが、そこにax3を追加します。
同様にthreshも追加してください。また、threshはスケールを動かした時にも変化しますので関数threshoにおいてもthreshをグローバル化しておいてください
あと、汎用画像を作成する際に配列をコピーするのに、copyというライブラリーを使用していませんがインポートしていませんでした。
import copy
と追加してください。
調整
プログラムは完成しましたが、最終的に見た目の調整をします。
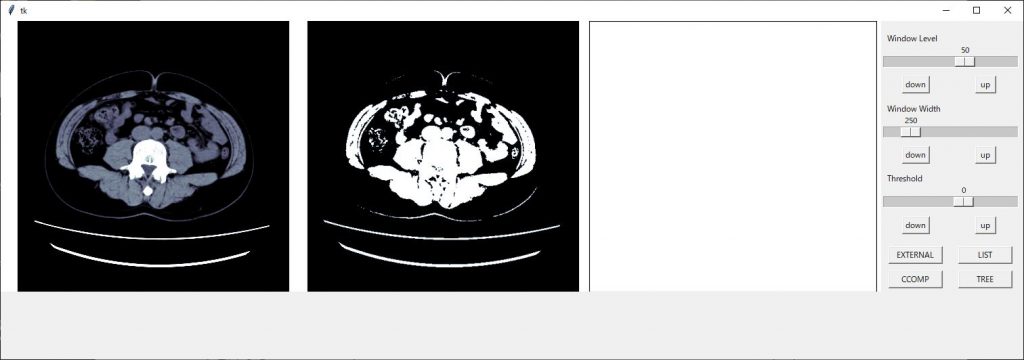
今までのコードを実行すると以下のような画面となり、ちょっとカッコ悪いので調整していきたいと思います。
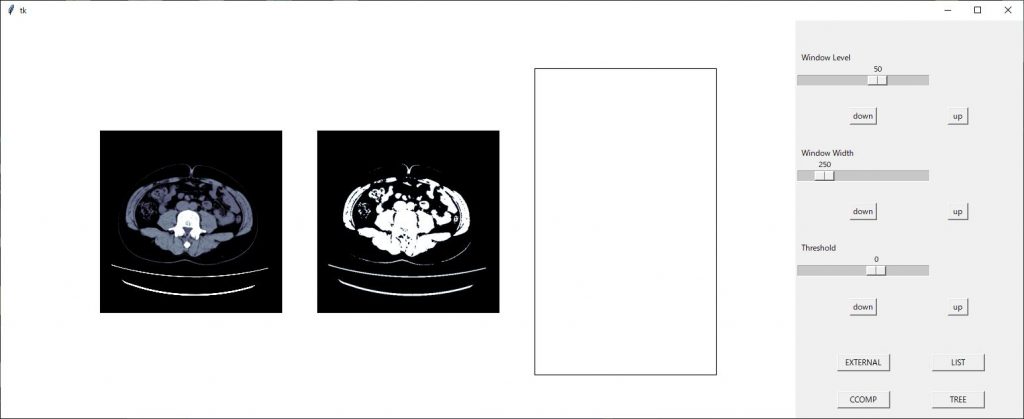
まずは、画像間隔を調整します。
axの軸設定の後に
plt.subplots_adjust(left=0.01, right=0.995, bottom=0, top=1, wspace=0.01)
のコードを挿入し画像間隔を設定します。詳しくはこちら
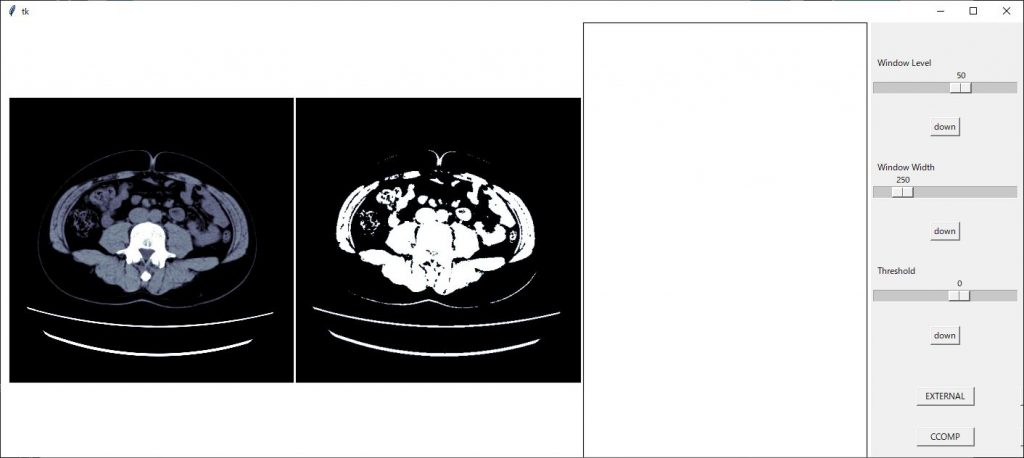
画像間隔が狭まりました。
新たに作成したax3の領域が大きいので画像サイズを(13,4)に変更してみます。
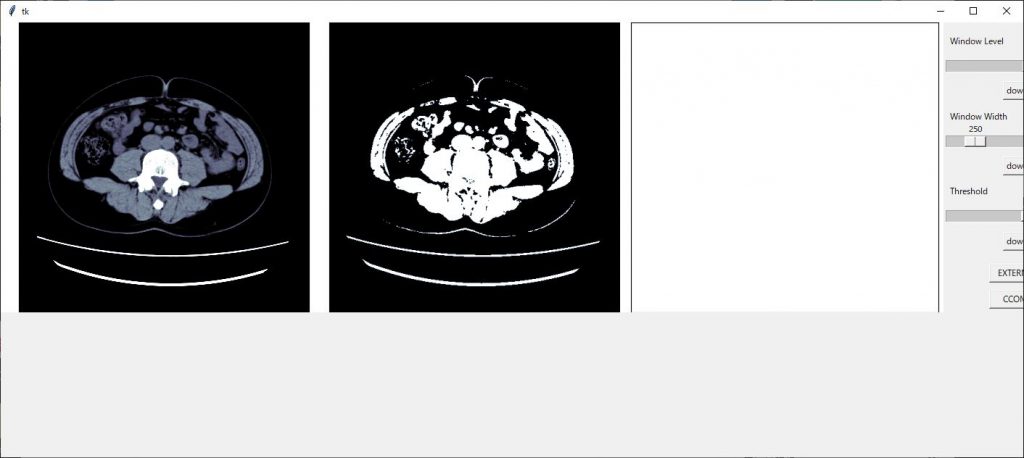
整ってきました、スケールの部分が切れてしまっているので領域のジオメトリーを 1510×500 に変更します
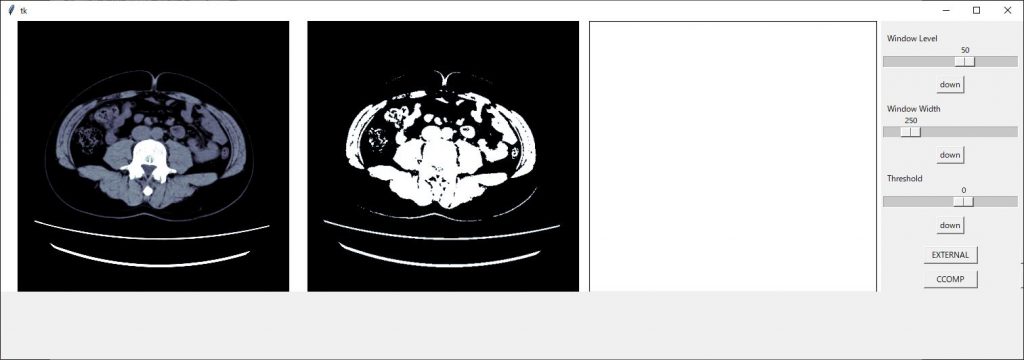
後はボタン類の配置を修正すれば見栄えが良くなりそうです
スケールの配置で1枠を使ってしまっているので2つを使い表示させるようにします。
スケールの設定で columnspan = 2
2枠を使った表示にできますのでそれぞれのスケールに追加します。
w_width_sc.grid(row=3, column=1,columnspan=2)
きれいに整いました!!
完成したコード
import tkinter as tk
import cv2
import matplotlib.pyplot as plt
from matplotlib.backends.backend_tkagg import FigureCanvasTkAgg
import numpy as np
import pydicom
import fileselect as fs
import copy

def cont():
    img_unit8 = copy.deepcopy(img_arr) #img_unit8としてコピー
    np.clip(img_unit8, ww_low, ww_high, out= img_unit8)
      #コピーした配列の最低値以下をウインドウ幅最低値に、
      # 最高値以上も同様に)

    img_unit8 -= img_unit8.min()
      #配列全体をウインドウ幅最低値を引くことで0からに変更)

    np.floor_divide(img_unit8, (img_unit8.max() + 1) / 256,
            out = img_unit8, casting='unsafe')
      #ウインドウ幅を256分割する。

    cv2.imwrite('./img_8bit.png',img_unit8)

def external():
    cont()
    img_png = cv2.imread('img_8bit.png')
    thresh_8bit = thresh.astype('u1')
    ret, contours, hierarchy = cv2.findContours(thresh_8bit, 0,   cv2.CHAIN_APPROX_SIMPLE)

    for contour in contours:
        cv2.drawContours(img_png, contours, -1, (255, 255, 0), 1)

    ax3.imshow(img_png, cmap='bone')
    fig.canvas.draw()
    cont_moment(contours)

def list():
    cont()

    img_png = cv2.imread('img_8bit.png')
    thresh_8bit = thresh.astype('u1')
    ret, contours, hierarchy = cv2.findContours(thresh_8bit, 1,  cv2.CHAIN_APPROX_SIMPLE)

    for contour in contours:
        cv2.drawContours(img_png, contours, -1, (255, 255, 0), 1)

    ax3.imshow(img_png, cmap='bone')
    fig.canvas.draw()
    cont_moment(contours)

def ccomp():
    cont()
    img_png = cv2.imread('img_8bit.png')
    thresh_8bit = thresh.astype('u1')
    ret, contours, hierarchy = cv2.findContours(thresh_8bit, 2, cv2.CHAIN_APPROX_SIMPLE)

    for contour in contours:
        cv2.drawContours(img_png, contours, -1, (255, 255, 0), 1)

    ax3.imshow(img_png, cmap='bone')
    fig.canvas.draw()
    cont_moment(contours)

def tree():
    cont()
    img_png = cv2.imread('img_8bit.png')
    thresh_8bit = thresh.astype('u1')
    ret, contours, hierarchy = cv2.findContours(thresh_8bit, 3,   cv2.CHAIN_APPROX_SIMPLE)

    for contour in contours:
        cv2.drawContours(img_png, contours, -1, (255, 255, 0), 1)

    ax3.imshow(img_png, cmap='bone')
    fig.canvas.draw()
    cont_moment(contours)

def cont_moment(contours):
    print('I got ' + str(len(contours)) + ' contours')

    for i in range(len(contours)):
        print('Contour area\t' + str(cv2.contourArea(contours[i])) + '\t arc length\t' + str(cv2.arcLength(contours[i],True)))


def level():
    global ww_low, ww_high, w_level, w_width

    window_level, window_width = level_sc.get(), w_width_sc.get()

    ww_low = window_level - (window_width // 2)
    ww_high = window_level + (window_width // 2)

def window(self):
    global ww_low, ww_high, img_arr, ax1

    level()

    ax1.imshow(img_arr, cmap='bone', vmin=ww_low, vmax=ww_high)
    fig.canvas.draw()

def thresho(self):
    global img_arr, ax2, fig
, thresh

    ret, thresh = cv2.threshold(img_arr, int(self), 255, cv2.THRESH_BINARY)
    ax2.imshow(thresh, cmap='bone')

    fig.canvas.draw()

def up():
    val = thre_sc.get() + 5
    thre_sc.set(val)

def down():
    val = thre_sc.get() - 5
    thre_sc.set(val)

def down_wl():
    val = level_sc.get() - 5
    level_sc.set(val)

def up_wl():
    val = level_sc.get() + 5
    level_sc.set(val)


def down_ww():
    val = level_sc.get() - 5
    level_sc.set(val)


def up_ww():
    val = level_sc.get() + 5
    level_sc.set(val)

def main():

    global ww_low, ww_high, img_arr, thre_sc, ax2, fig, \
        img_arr, ax1, level_sc, w_width_sc, ww_low, ww_high, w_level, w_width, \
        ax3, thresh


    filename = fs.single_fileselect()
    dcm = pydicom.dcmread(filename)
    img_arr = np.array(dcm.pixel_array)
    w_level = int(dcm[0x0028,0x1050].value)
    w_width = int(dcm[0x0028, 0x1051].value)

    fig = plt.figure(figsize=(13, 4))
    ax1 = fig.add_subplot(1, 3, 1)
    ax2 = fig.add_subplot(1, 3, 2)
    ax3 = fig.add_subplot(1, 3, 3)

    ax1.axes.xaxis.set_visible(False), ax1.axes.yaxis.set_visible(False)
    ax2.axes.xaxis.set_visible(False), ax2.axes.yaxis.set_visible(False)
    ax3.axes.xaxis.set_visible(False), ax3.axes.yaxis.set_visible(False)
    plt.subplots_adjust(left=0.01, right=0.995, bottom=0, top=1, wspace=0.01)


    root = tk.Tk()
    root.geometry("1510x500")

    Canvas = FigureCanvasTkAgg(fig, master=root)
    Canvas.get_tk_widget().grid(row=0, column=0, rowspan=10)


    var_scale_level = tk.IntVar()
    level_sc = tk.Scale(root,
        label='Window Level',
        variable=var_scale_level,
        orient=tk.HORIZONTAL,
        length=200,
        from_= np.min(img_arr),
        to=np.max(img_arr),
        command=window)
    level_sc.set(w_level)
    level_sc.grid(row=1, column=1,columnspan=2)

    down_wl_btn = tk.Button(root, text="down", command=down_wl)
    down_wl_btn.grid(row=2, column=1)

    up_wl_btn = tk.Button(root, text=" up ", command=up_wl)
    up_wl_btn.grid(row=2, column=2)

    var_scale_w_width = tk.IntVar()
    w_width_sc = tk.Scale(root,
        label = 'Window Width',
        variable=var_scale_w_width,
        orient=tk.HORIZONTAL,
        length=200,
        from_=0,
        to=(np.max(img_arr) - np.min(img_arr))//2,
        command=window)
    w_width_sc .set(w_width)
    w_width_sc.grid(row=3, column=1,columnspan=2)

    down_ww_btn = tk.Button(root, text="down", command=down_ww)
    down_ww_btn.grid(row=4, column=1)

    up_ww_btn = tk.Button(root, text=" up ", command=up_ww)
    up_ww_btn.grid(row=4, column=2)

    thre = 0

    var_thre = tk.IntVar()
    thre_sc = tk.Scale(root,
        label='Threshold',
        variable=var_thre,
        orient=tk.HORIZONTAL,
        length=200,
        from_=np.min(img_arr),
        to=np.max(img_arr),
        command=thresho)
    thre_sc.set(thre)
    thre_sc.grid(row=5, column=1)

    down_btn = tk.Button(root, text="down", command=down)
    down_btn.grid(row=6, column=1,columnspan=2)

    up_btn = tk.Button(root, text=" up ", command=up)
    up_btn.grid(row=6, column=2)

    ext_but = tk.Button(root, text="EXTERNAL", command=external, width = 10)
    ext_but.grid(row=8, column=1)

    list_but = tk.Button(root, text="LIST", command=list, width = 10)
    list_but.grid(row=8, column=2)

    ccomp_but = tk.Button(root, text="CCOMP", command=ccomp, width = 10)
    ccomp_but.grid(row=9, column=1)

    TREE_but = tk.Button(root, text="TREE", command=tree, width = 10)
    TREE_but.grid(row=9, column=2)

    window(1)
    thresho(1)

    root.mainloop()

if __name__ == "__main__":
    main()
最後に
いかがでしたか?領域抽出のプログラムきちんと動きましたか?
このコードを更に発展させていけば、内臓脂肪計測のプログラムも作れそうですね。
興味のある方は挑戦してみてください。
お疲れ様でした。
環境
- windows10
- python3.6.1
- Anaconda custom(64-bit)
- PyCharm2020.2(Communication Edition)
プログラムの流れ
プログラム作成の流れを組んでみたいと思います。
まずは、前回組んだ
領域抽出の設定、閾値設定を確認できるプログラムを組んでみたをベースに機能拡張していきたいと思います。
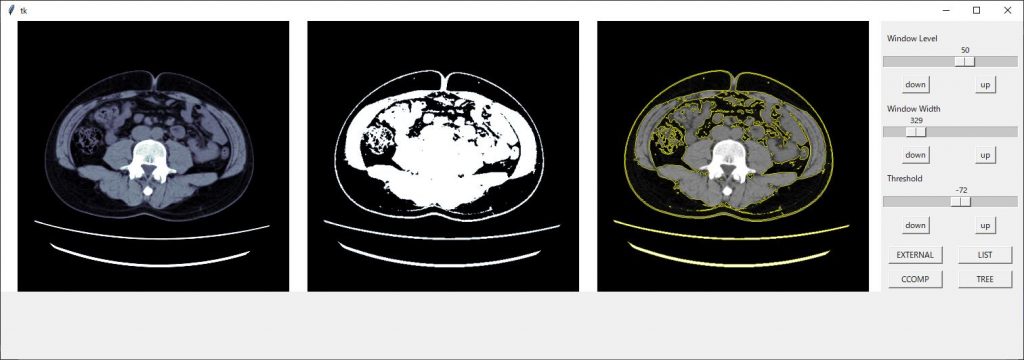
画像表示部分を一つ追加し、そこに領域抽出した画像を表示します。
また、openCVの領域抽出は4種類ありますので、それら抽出方法を選べるように4つのボタンを配置します。
また、領域抽出した領域の面積および、外周の長さを表示するようにします。
最後に、プログラムの組み方が悪いのか、私のPCのスペックが低いのか、スケールを動かした時の動作が遅くなるので、それぞれのスケールの値を一定数増加、減少することができるボタンを配置したいと思います。
- 画像領域を一つ追加
- 4種類の領域抽出ボタンを追加
- 抽出結果を表示
- スケールの増減ボタンを配置
最終的には以下のようになります。
前回のコード
前回のコードは以下になります
import tkinter as tk
import cv2
import matplotlib.pyplot as plt
from matplotlib.backends.backend_tkagg import FigureCanvasTkAgg
import numpy as np
import pydicom
import fileselect as fs


def level():
    global ww_low, ww_high, w_level, w_width

    window_level, window_width = level_sc.get(), w_width_sc.get()

    ww_low = window_level - (window_width // 2)
    ww_high = window_level + (window_width // 2)

def window(self):
    global ww_low, ww_high, img_arr, ax1

    level()

    ax1.imshow(img_arr, cmap='bone', vmin=ww_low, vmax=ww_high)
    fig.canvas.draw()

def thresho(self):
    global img_arr, ax2, fig

    ret, thresh = cv2.threshold(img_arr, int(self), 255, cv2.THRESH_BINARY)
    ax2.imshow(thresh, cmap='bone')

    fig.canvas.draw()


def main():
    global ww_low, ww_high, img_arr, thre_sc, ax2, fig,\
        img_arr, ax1, level_sc, w_width_sc, ww_low, ww_high, w_level, w_width


    filename = fs.single_fileselect()
    dcm = pydicom.dcmread(filename)
    img_arr = np.array(dcm.pixel_array)
    w_level = int(dcm[0x0028,0x1050].value)
    w_width = int(dcm[0x0028, 0x1051].value)

    fig = plt.figure(figsize=(12, 6))
    ax1 = fig.add_subplot(1, 2, 1)
    ax2 = fig.add_subplot(1, 2, 2)

    ax1.axes.xaxis.set_visible(False), ax1.axes.yaxis.set_visible(False)
    ax2.axes.xaxis.set_visible(False), ax2.axes.yaxis.set_visible(False)


    root = tk.Tk()
    root.geometry("1410x600")

    Canvas = FigureCanvasTkAgg(fig, master=root)
    Canvas.get_tk_widget().grid(row=0, column=0, rowspan=10)


    var_scale_level = tk.IntVar()
    level_sc = tk.Scale(root,
        label='Window Level',
        variable=var_scale_level,
        orient=tk.HORIZONTAL,
        length=200,
        from_= np.min(img_arr),
        to=np.max(img_arr),
        command=window)
    level_sc.set(w_level)
    level_sc.grid(row=1, column=1)

    var_scale_w_width = tk.IntVar()
    w_width_sc = tk.Scale(root,
        label = 'Window Width',
        variable=var_scale_w_width,
        orient=tk.HORIZONTAL,
        length=200,
        from_=0,
        to=(np.max(img_arr) - np.min(img_arr))//2,
        command=window)
    w_width_sc .set(w_width)
    w_width_sc.grid(row=3, column=1)


    thre = 0

    var_thre = tk.IntVar()
    thre_sc = tk.Scale(root,
        label='Threshold',
        variable=var_thre,
        orient=tk.HORIZONTAL,
        length=200,
        from_=np.min(img_arr),
        to=np.max(img_arr),
        command=thresho)
    thre_sc.set(thre)
    thre_sc.grid(row=5, column=1)

    window(1)
    thresho(1)

    root.mainloop()

if __name__ == "__main__":
    main()
コードを組んでいく
それでは、流れに沿ってコードを組んでいきたいと思います
画像領域を一つ追加
ここは単純に上記コードの49行目と52行目にax3として追加していきます。
追加コードは以下
ax3 = fig.add_subplot(1, 3, 3)
ax3.axes.xaxis.set_visible(False), ax3.axes.yaxis.set_visible(False)
ax3の追加に伴い47行目、48行目は真ん中の数字が”2”から”3”に変更になります。
ax1 = fig.add_subplot(1, 3, 1)
ax2 = fig.add_subplot(1, 3, 2)
4種類の領域抽出ボタンを追加
tkinterのボタンの設置は
ボタンの名前 = tkinter.Button(配置するフィールド, text=”ボタン上に表示する文字”, command=ボタンを押した時の動作, width = ボタンの幅)
で設定し、
ボタンの名前.grid(row=8, column=1)
で表示場所の指定をします。
今回はopenCVの領域抽出方法である”EXTERNAL”、”LIST”、”CCOMP”、”TREE”の4つのボタンを配置します。
コードは以下となります。
ext_but = tk.Button(root, text="EXTERNAL", command=external, width = 10)
ext_but.grid(row=8, column=1)

list_but = tk.Button(root, text="LIST", command=list, width = 10)
list_but.grid(row=8, column=2)

ccomp_but = tk.Button(root, text="CCOMP", command=ccomp, width = 10)
ccomp_but.grid(row=9, column=1)

TREE_but = tk.Button(root, text="TREE", command=tree, width = 10)
TREE_but.grid(row=9, column=2)
上記コードを
window(1)
の前、大体100行目辺りになると思います。に記載しましょう。
抽出結果を表示
抽出結果を一番右側の画像表示領域に表示するコードに入ります。
初めに、領域を抽出するのはDICOM画像の配列でもできますが8ビット階調に変換する必要があります。
結果を画像上に重ね合わせるのは8ビット階調の汎用画像(jpgや、png画像)でなければならないという事。
なので、まずは4つのボタンが押された時に、まず汎用画像を作成する事を行わなければなりません。
手間は増えますが、階調を合わせた一番左の画像に重ね合わせたいので一番左の画像を一度汎用画像として保存してそれを使いたいと思います。
汎用画像に保存
一番左側の画像条件で画像を一度汎用画像に保存します。DICOM画像は16ビット画像なので8ビット画像に変換する必要があります。
とりあえず、画像配列をコピーしウインドウ幅の最低値以下のピクセル値を最低の値に、ウインドウ幅の最高値以上のピクセル値を最大の値に変えます。
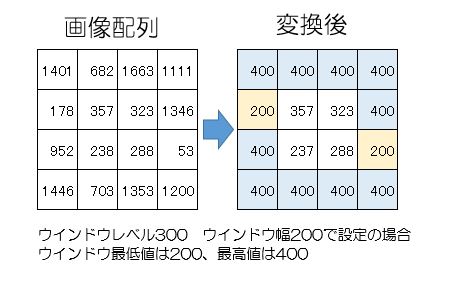
その後、ウインドウ幅を0~256の階調に割り振ります。
そして、img_8bit.pngという名前で、プログラムがあるフォルダに保存します。
これらコードを関数としておきましょう。今回はcontという名前で作成しました。
def cont():
    img_unit8 = copy.deepcopy(img_arr) #img_unit8としてコピー

    np.clip(img_unit8, ww_low, ww_high, out= img_unit8)
          #コピーした配列の最低値以下をウインドウ幅最低値に、
           # 最高値以上も同様に)

    img_unit8 -= img_unit8.min()
          #配列全体をウインドウ幅最低値を引くことで0からに変更)

    np.floor_divide(img_unit8, (img_unit8.max() + 1) / 256,
                out = img_unit8, casting='unsafe')
          #ウインドウ幅を256分割する。

    cv2.imwrite('./img_8bit.png',img_unit8)
領域抽出のプログラム
領域抽出は、閾値設定した配列 ”thresh” で行います。(以前のコード29行目で定義)以前のプログラムで閾値設定した配列は ”thresh” という変数名で持っています。
しかし、先ほども記載しましたが領域抽出は8ビット階調の配列でなければいけないので16ビットの配列を8ビット階調に変換します。
thresh_8bit = thresh.astype('u1')
ここで、”u1”とは符号なしの8ビット整数型を示します。
今、階調変換した配列を用いて領域抽出を行います。
ret, contours, hierarchy = cv2.findContours(thresh_8bit, 0, cv2.CHAIN_APPROX_SIMPLE)
最新バージョンのfindContoursの戻り値は3つから2つに変わり、retの戻り値は廃止になった模様です。もし、エラーが出た場合、retを削除してから試してください。
領域抽出の結果はcontoursに入っています。それらを先ほど保存した汎用画像の上に表示していきます。
表示には
cv2.drawContours(img_png, contours, -1, (255, 255, 0), 1)
で表示できますので、これをfor文で表示していきます。drowContoursについて詳しくはチュートリアルをご覧ください
以上の工程を領域抽出方法4個分の関数として作成していきます。
例えば、 cv2.RETR_LISTの場合
def list():
    cont()
    #ping画像の作成関数
    img_png = cv2.imread('img_8bit.png')  #作成した画像の読み込み

    thresh_8bit = thresh.astype('u1')
 #閾値配列を8ビット化

    ret, contours, hierarchy = cv2.findContours(thresh_8bit, 1,cv2.CHAIN_APPROX_SIMPLE)

    for contour in contours:
        cv2.drawContours(img_png, contours, -1, (255, 255, 0), 1)
    ax3.imshow(img_png, cmap='bone')

    fig.canvas.draw()
ちなみに、findContoursの第2引数は領域抽出の方法なのですが、4つの種類が用意されていて以下の様になっています。
| 抽出方法 | 番号 | 内容 |
| cv2.RETR_EXTERNAL | 0 | 輪郭のうち、最も外側のみ抽出 |
| cv2.RETR_LIST | 1 | 全ての輪郭を抽出 |
| cv2.RETR_CCOMP | 2 | 全ての輪郭を2レベルの階層に分けて出力 |
| cv2.RETR_TREE | 3 | 抽出した内側の輪郭も抽出 |
抽出方法の”cv2.RETR_LIST”などの文字列でも指定できますが、番号でも指定できます。
4つの抽出方法の関数は以下のようになります。
def external():
    img_png = cv2.imread('img_8bit.png')
    thresh_8bit = thresh.astype('u1')
    ret, contours, hierarchy = cv2.findContours(thresh_8bit, 0,   cv2.CHAIN_APPROX_SIMPLE)

    for contour in contours:
        cv2.drawContours(img_png, contours, -1, (255, 255, 0), 1)

    ax3.imshow(img_png, cmap='bone')
    fig.canvas.draw()

def list():
    img_png = cv2.imread('img_8bit.png')
    thresh_8bit = thresh.astype('u1')
    ret, contours, hierarchy = cv2.findContours(thresh_8bit, 1,  cv2.CHAIN_APPROX_SIMPLE)

    for contour in contours:
        cv2.drawContours(img_png, contours, -1, (255, 255, 0), 1)

    ax3.imshow(img_png, cmap='bone')
    fig.canvas.draw()

def ccomp():
    img_png = cv2.imread('img_8bit.png')
    thresh_8bit = thresh.astype('u1')
    ret, contours, hierarchy = cv2.findContours(thresh_8bit, 2, cv2.CHAIN_APPROX_SIMPLE)

    for contour in contours:
        cv2.drawContours(img_png, contours, -1, (255, 255, 0), 1)

    ax3.imshow(img_png, cmap='bone')
    fig.canvas.draw()

def tree():
    img_png = cv2.imread('img_8bit.png')
    thresh_8bit = thresh.astype('u1')
    ret, contours, hierarchy = cv2.findContours(thresh_8bit, 3,   cv2.CHAIN_APPROX_SIMPLE)

    for contour in contours:
        cv2.drawContours(img_png, contours, -1, (255, 255, 0), 1)

    ax3.imshow(img_png, cmap='bone')
    fig.canvas.draw()
ちょっと、長くなってしまいました。
今回はここまでとします。
次回、4つのボタンから最後に作成した関数に繋げて、領域抽出を行いその結果を表示するところまでやっていきたいと思います。
お疲れ様でした。
はじめに
こんにちは、でめきんです。
今回はopenCVを使って輪郭を識別することをやってみたいと思います。
今回の輪郭抽出はDICOM画像ではなく、以下のjpg画像を用います。

輪郭抽出の手順
- 画像の読み込み
- 画像の2値化
- 閾値設定を行う
- 領域を抽出
- 領域を重ね合わせ
- 画像表示
画像の読み込み
openCVの画像読み込みは
img = cv2.imread(“img.JPG”)
画像の2値化 cv2.cvtColor
領域抽出をする際に、色情報があると領域の境が曖昧になってしまいますのでグレイスケールに変換します。
img_gray = cv2.cvtColor(img, cv2.COLOR_BGR2GRAY)
閾値設定 cv2.threshold
閾値設定をして画像の領域の調整します。
ret, thresh = cv2.threshold(img_gray,127,255,cv2.THRESH_BINARY)
閾値設定とは、第2引数(上のコードでは’127’)よりも大きい値が第3引数の値(255)に第2引数よりも小さい数字は0に置き換わります。

領域を抽出 cv2.findContours
いよいよ本題に入っていきます。
領域の抽出は一度画像上のすべての領域を検出します。その後、表示の際に大きさであったり、輪郭線の長さであったりで抽出条件を指定して表示します。
(私は、初めから抽出条件を指定して領域を探し出すものと勘違いしていたので理解するのに苦労しました・・・・そんな人はいないかな・・・・)
まずは、領域抽出
ret, contours, hierarchy = cv2.findContours(thresh, cv2.RETR_TREE, cv2.CHAIN_APPROX_SIMPLE)
第1引数は画像を指し、第2引数に抽出方法、第3引数として近似手法を指定します。
抽出方法
| cv2.RETR_EXTERNAL | 輪郭のうち、最も外側のみ抽出 | |
| cv2.RETR_LIST | 全ての輪郭を抽出 | |
| cv2.RETR_CCOMP | 全ての輪郭を2レベルの階層に分けて出力 | |
| cv2.RETR_TREE | 抽出した内側の輪郭も抽出 |
近似方法
| cv2.CHAIN_APPROX_NON | 輪郭上の全点をの情報を保持 |
| cv2.CHAIN_APPROX_SIMPLE | 輪郭を圧縮し情報を保持 |
領域を重ね合わせ cv2.drawContours
領域の抽出が済みましたら、今度は元画像との重ね合わせとなります。
cv2.drawContours
cv2.drawContours(img, contours, 3, color, 2)
| 第1引数 | 重ね合わせる画像 |
| 第2引数 | 領域抽出したリスト |
| 第3引数 | リストの中の何番目を表示するか (すべてを表示する場合は-1を指定します。) |
| 第4引数 | 線のカラー |
| 第5引数 | 線の太さ |
画像表示
cv2.imshow(‘conturing’,img)
と忘れてはいけない
cv2.waitKey(0)
cv2.destroyAllWindows()
コード
import cv2

img = cv2.imread("img.JPG")
img_gray = cv2.cvtColor(img, cv2.COLOR_BGR2GRAY)

ret, thresh = cv2.threshold(img_gray,127,255,cv2.THRESH_BINARY)
ret, contours, hierarchy = cv2.findContours(thresh, cv2.RETR_TREE, cv2.CHAIN_APPROX_SIMPLE)

color = (255, 255, 0)

for contour in contours:

    # 境界の描画 ( img データに contours データをマージ )
    cv2.drawContours(img, contours, -1, color, 2)

cv2.imshow('conturing',img)

cv2.waitKey(0)
cv2.destroyAllWindows()

最後に
いかがでしたか?
今回は概要となりますが、今後機会があれば、もう少し詳しく記事にしていきたいと思います。
お疲れ様でした。
The post openCVで輪郭抽出をやってみた first appeared on 診療放射線技師がPythonをはじめました。.]]>