はじめに
プログラムを組んでいて、あるキーを押したらこんな動作を組みたいなと思うことがあったのですが、キーイベントの記事がなかなか見つからなくて苦労したので、今回はそれを書いていこうと思います。
キーイベントとは
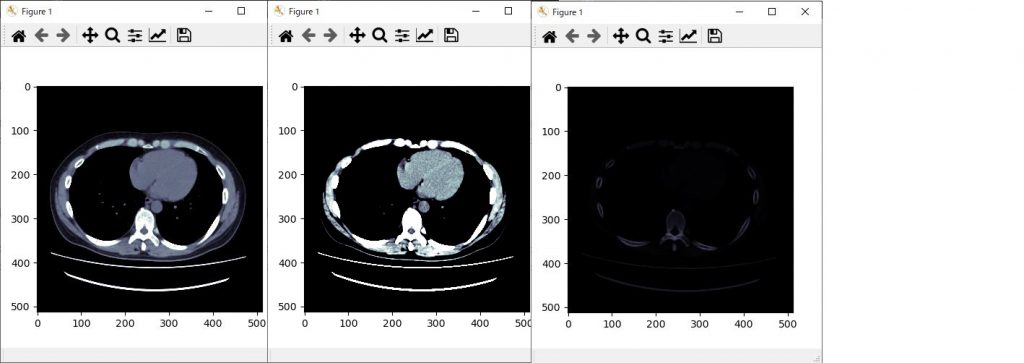
キーイベントとはキーボード上のキーを押したことによって動作を決定することで、例えばF1キーを押すことで、画像のWW,WLを頭部の条件に設定する、F2キーで肺野条件にすることや、シフトキーを押しながらマウスホイールで画像拡大をする等の機能を設定することです。
今回は、簡単なF1キーを押すことで頭部条件、F2キーで肺野条件、F3キーで腹部条件、F4キーで骨条件を表示画像に適応する方法をやってみたいと思います。
イベント
キーボードのイベントは押された時と、離した時のイベントがあります。
- key_press_event : キーボードのキーが押された時
- key_release_event : キーボードのキーが離された時
イベントの設定は以下のコードで行います。
fig.canvas.mpl_connect('イベント名', イベントが発生した時の動作を記した関数)
今回は押した時のイベントだけ扱います。
コードを書く
まずは、コードの流れです。
- 画像取り込み
- イベント関数の設定
- 機能実装
- 複数回使うコードの整理
画像の取り込みから表示まで
まずは、pydicom、numpy、matplotlibのインポートと毎回用いているfileselectのモジュール、ピクセルデータを配列に取り込むクラスのコードをコピーしましょう。
そして、画像ファイルをフォルダで一括選択しそのパスをfilenamesの変数の取り込み、クラスに渡してピクセルデータを配列に取り込みます。その後、matplotlibで画像表示領域の設定、マウスホイールを使って画像を変えていくコードまで一気に設定してしまいましょう。
# -- coding utf-8 --
import pydicom
import numpy as np
import matplotlib.pyplot as plt
import fileselect as fs

class Pixarr:
    def __init__(self,filenames):
        dcm = pydicom.dcmread(filenames[0])

        self.row = dcm[0x0028,0x0010].value
        self.column = dcm[0x0028,0x0011].value
        self.ww = dcm[0x0028,0x1050].value
        self.wl = dcm[0x0028,0x1050].value

        self.pix_arr = np.zeros((len(filenames),self.row,self.column),
            dtype ='int16')

        if len(filenames) == 1:
            self.pix_arr = dcm.pixel_array
        else:
            for i in range(len(filenames)):
                dcm = pydicom.dcmread(filenames[i])
                img_no = dcm[0x0020,0x0013].value
                self.pix_arr[img_no-1] = dcm.pixel_array

def wheel_scroll(event):
    global sl

    if event.button == 'down':
        sl += 1
        if sl > len(filenames)-1:
            sl =0

    if event.button == 'up':
        sl -= 1
        if sl < 0:
            sl = len(filenames)-1

    ax.imshow(f0.pix_arr[sl], cmap='bone')

    fig.canvas.draw()

filenames = fs.folder_fileselect()
f0 = Pixarr(filenames)

sl = 0

fig = plt.figure()
ax = fig.add_subplot()

ax.imshow(f0.pix_arr[sl],cmap= 'bone')
fig.canvas.mpl_connect('scroll_event', wheel_scroll)
plt.show()
イベントで返される変数を調べる
それでは、キーイベントの設定をします。キーが押された時のイベントは
fig.canvas.mpl_connect('イベント名', イベントが発生した時の動作を記した関数)
で呼び出し、イベント名は ’key_press_event’ でした。
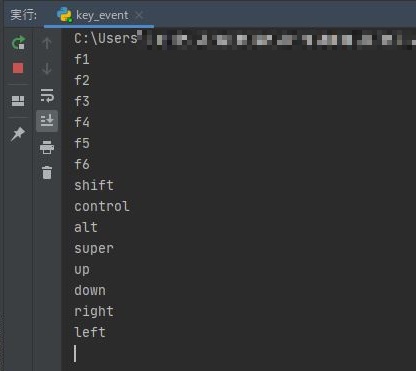
押した時の動作は、関数 ’key_press’ で書いていきましょう(関数名は何でも構いません)。まずは、キーが押された時、どのように変数が返ってくるのか確認します。
# -- coding utf-8 --
import pydicom
import numpy as np
import matplotlib.pyplot as plt
import fileselect as fs

class Pixarr:
    def __init__(self,filenames):
        dcm = pydicom.dcmread(filenames[0])

        self.row = dcm[0x0028,0x0010].value
        self.column = dcm[0x0028,0x0011].value
        self.ww = dcm[0x0028,0x1050].value
        self.wl = dcm[0x0028,0x1050].value

        self.pix_arr = np.zeros((len(filenames),self.row,self.column),
            dtype ='int16')

        if len(filenames) == 1:
            self.pix_arr = dcm.pixel_array
        else:
            for i in range(len(filenames)):
                dcm = pydicom.dcmread(filenames[i])
                img_no = dcm[0x0020,0x0013].value
                self.pix_arr[img_no-1] = dcm.pixel_array

def wheel_scroll(event):
    global sl

    if event.button == 'down':
        sl += 1
        if sl > len(filenames)-1:
            sl =0

    if event.button == 'up':
        sl -= 1
        if sl < 0:
            sl = len(filenames)-1

    ax.imshow(f0.pix_arr[sl], cmap='bone')

    fig.canvas.draw()

def key_press(event):
    print(event.key)

filenames = fs.folder_fileselect()
f0 = Pixarr(filenames)

sl = 0

fig = plt.figure()
ax = fig.add_subplot()

ax.imshow(f0.pix_arr[sl],cmap= 'bone')

fig.canvas.mpl_connect('scroll_event', wheel_scroll)
fig.canvas.mpl_connect('key_press_event', key_press)

plt.show()
いかがでしたか?F1、F2、shiftキー等押すと上記図のような変数が返ってきます。ちなみに、’super’とはwindowsマークを押した時のeventです。
返ってくる変数が分かったので、機能を実装していきたいと思います。
機能の実装
それでは、機能を実装していきます。
まず、画像を表示するコード(上記コード56行目)ですが
ax.imshow(f0.pix_arr[sl], cmap='bone')の部分に、画像の最小値と、最大値を指定するコードを追加します。これは、画像のWWに当たるところですので変数名を最小値をww_L、最大値をww_Hとして指定したいと思います。
ax.imshow(f0.pix_arr[sl], vmin = ww_L , vmax = ww_H , cmap='bone')それでは、キーが押された時の設定に入ります。
CT画像のWL,WWの設定は以下のようにした場合
| WL | WW | |
| 頭部条件 | 35 | 70 |
| 肺野条件 | -600 | 1600 |
| 腹部条件 | 60 | 360 |
| 骨部条件 | 1500 | 3000 |
ww_Lとww_Hの設定はそれぞれ以下のようになります。
| ww_L | ww_H | |
| 頭部条件 | 0 | 70 |
| 肺野条件 | -1400 | 200 |
| 腹部条件 | -120 | 240 |
| 骨部条件 | 0 | 3000 |
上記条件をそれぞれF1に頭部条件,F2に肺野条件,F3に腹部条件,F4に骨条件として割り当てた場合
def key_press(event)の関数は以下となります。
def key_press(event):
    if event.key == "f1":
        ww_L , ww_H = 0 , 70

    if event.key == "f2":
        ww_L , ww_H = -1400 , 200

    if event.key == "f3":
        ww_L , ww_H = -120 , 240

    if event.key == "f4":
        ww_L , ww_H = 0 , 3000
そして、画像表示のコード
ax.imshow(f0.pix_arr[sl], vmin = ww_L , vmax = ww_H , cmap='bone')

fig.canvas.draw()
を付け足してあげることで画像条件を変更するプログラムは完成です。
# -- coding utf-8 --
import pydicom
import numpy as np
import matplotlib.pyplot as plt
import fileselect as fs

class Pixarr:
    def __init__(self,filenames):
        dcm = pydicom.dcmread(filenames[0])

        self.row = dcm[0x0028,0x0010].value
        self.column = dcm[0x0028,0x0011].value
        self.ww = dcm[0x0028,0x1050].value
        self.wl = dcm[0x0028,0x1050].value

        self.pix_arr = np.zeros((len(filenames),self.row,self.column),
            dtype ='int16')

        if len(filenames) == 1:
            self.pix_arr = dcm.pixel_array
        else:
            for i in range(len(filenames)):
                dcm = pydicom.dcmread(filenames[i])
                img_no = dcm[0x0020,0x0013].value
                self.pix_arr[img_no-1] = dcm.pixel_array

def wheel_scroll(event):
    global sl

    if event.button == 'down':
        sl += 1
        if sl > len(filenames)-1:
            sl =0

    if event.button == 'up':
        sl -= 1
        if sl < 0:
            sl = len(filenames)-1

    ax.imshow(f0.pix_arr[sl], cmap='bone')

    fig.canvas.draw()

def key_press(event):
    if event.key == "f1":
        ww_L , ww_H = 0 , 70

    if event.key == "f2":
        ww_L , ww_H = -1400 , 200

    if event.key == "f3":
        ww_L , ww_H = -120 , 240

    if event.key == "f4":
        ww_L , ww_H = 0 , 3000

    ax.imshow(f0.pix_arr[sl], vmin = ww_L , vmax = ww_H , cmap='bone')

    fig.canvas.draw()


filenames = fs.folder_fileselect()
f0 = Pixarr(filenames)

sl = 0

fig = plt.figure()
ax = fig.add_subplot()

ax.imshow(f0.pix_arr[sl],cmap= 'bone')

fig.canvas.mpl_connect('scroll_event', wheel_scroll)
fig.canvas.mpl_connect('key_press_event', key_press)

plt.show()
皆さん、いかがでしたか?プログラムはきちんと動きましたか?
複数回使うコードは関数化
気づかれた方もいると思いますが、条件を変更してもマウスホイールで画像を切り替えてしまうとまた、条件が元に戻ってしまうんです。
何が原因かというと、画像を表示するコードが複数ある事で設定し忘れているところがあるんです。現在作成したコードでは41行目と、58行目に画像表示設定があるわけなのですが41行目にはvminとvmaxの指定をしていないのです。
この様に、同じコードを何度も使う場合はその部分を関数化してしまうのが間違いがなく、しかも設定が楽になりますので関数化してしまいましょう。
58行目から60行目までを関数化します。
def img_show():
    ax.imshow(f0.pix_arr[sl], vmin = ww_L , vmax = ww_H , cmap='bone')
    fig.canvas.draw()
上記関数を作成し、62行目辺りに入れます。(44行目に入れても構いません)
ただ、今の状態だとvminとvmaxの変数はkey_pressの中でだけ有効なので
global化しておきましょう。def img_show()とdef key_press(event)
の下に
global ww_L , ww_H と記載しておきます。
そして、41~43行目、58~60行目を
img_show()
と書き換えることで完成ですが、どうせなので、初期設定も腹部条件で表示させるようにも設定しておきましょう。
sl =0の所で一緒に設定してしまいましょう
sl , ww_L , ww_H = 0 , -120 , 240
71行目のコードを
img_show()
としてあげましょう。そうすることで画像表示の設定はimg_show()の関数内の設定だけで完了します。
完成コードを以下に示します。
# -- coding utf-8 --
import pydicom
import numpy as np
import matplotlib.pyplot as plt
import fileselect as fs


class Pixarr:
    def __init__(self, filenames):
        dcm = pydicom.dcmread(filenames[0])

        self.row = dcm[0x0028, 0x0010].value
        self.column = dcm[0x0028, 0x0011].value
        self.ww = dcm[0x0028, 0x1050].value
        self.wl = dcm[0x0028, 0x1050].value

        self.pix_arr = np.zeros((len(filenames), self.row, self.column),
                                dtype='int16')

        if len(filenames) == 1:
            self.pix_arr = dcm.pixel_array
        else:
            for i in range(len(filenames)):
                dcm = pydicom.dcmread(filenames[i])
                img_no = dcm[0x0020, 0x0013].value
                self.pix_arr[img_no - 1] = dcm.pixel_array


def wheel_scroll(event):
    global sl

    if event.button == 'down':
        sl += 1
        if sl > len(filenames) - 1:
            sl = 0

    if event.button == 'up':
        sl -= 1
        if sl < 0:
            sl = len(filenames) - 1

    img_show()


def key_press(event):
    global ww_L, ww_H
    if event.key == "f1":
        ww_L, ww_H = 0, 70

    if event.key == "f2":
        ww_L, ww_H = -1400, 200

    if event.key == "f3":
        ww_L, ww_H = -120, 240

    if event.key == "f4":
        ww_L, ww_H = 0, 3000

    img_show()

def img_show():
    global  ww_L, ww_H
    ax.imshow(f0.pix_arr[sl], vmin = ww_L , vmax = ww_H , cmap='bone')
    fig.canvas.draw()

filenames = fs.folder_fileselect()
f0 = Pixarr(filenames)

sl = 0
ww_L , ww_H = -120 , 240

fig = plt.figure()
ax = fig.add_subplot()


img_show()
#ax.imshow(f0.pix_arr[sl], cmap='bone')

fig.canvas.mpl_connect('scroll_event', wheel_scroll)
fig.canvas.mpl_connect('key_press_event', key_press)

plt.show()
最後に
皆さんいかがでしたか?
今回は、ファンクションキーに画像条件のプリセット機能を付けてみましたが、その他にも、シフトキーを押しながらマウスホイールで画像拡大とか使い道はいろいろあります。
是非とも使ってみてくださいね。
お疲れ様でした。
環境
- windows10
- python3.6.1
- Anaconda custom(64-bit)
- PyCharm2020.2(Communication Edition)